
ruger american trigger adjustment instructions
- Published
- in Instructions
The Ruger American Rifle’s trigger adjustment allows shooters to customize their firearm for a smoother‚ more precise shooting experience. Online guides provide detailed optimization steps for owners.
Overview of the Ruger American Rifle Trigger System
The Ruger American Rifle features a user-adjustable trigger system designed for precision and reliability. It includes pre-travel and overtravel adjustment screws‚ allowing shooters to customize the trigger pull to their preference. The system also incorporates a sear engagement screw to ensure consistent and safe functionality. Polishing key components‚ such as the trigger return spring tunnel and transfer bar‚ can further enhance the trigger’s smoothness. This modular design makes it accessible for owners to fine-tune their rifle’s performance without specialized tools‚ ensuring a tailored shooting experience.
Tools and Materials Needed for Trigger Adjustment
Essential tools include screwdrivers‚ punches‚ and a torque wrench. Polishing materials like fine sandpaper and lubricants are recommended for smoothing trigger components. Safety gear is a must.
Essential Tools: Screwdrivers‚ Punches‚ and Other Hardware
Adjusting the Ruger American Rifle trigger requires a flathead screwdriver for pre-travel and overtravel screws. A punch is needed to remove trigger pins. Hex keys or Torx drivers may be necessary for specific adjustments. Additional tools include a small hammer for gentle tapping and safety gear like safety glasses. Ensure all tools are of high quality to avoid damaging the firearm. Proper tool selection is critical for safe and effective trigger customization‚ as outlined in online tutorials and forums. Always refer to the manufacturer’s guidelines for compatibility and safety.
Recommended Materials for Polishing and Lubrication
Recommended Materials for Polishing and Lublication
For polishing the trigger components‚ use jeweler’s rouge or fine-grit sandpaper to smooth surfaces. Apply a high-quality gun oil or silicone-based lubricant to reduce friction and prevent wear. Avoid petroleum-based products‚ as they can attract dust. Polishing the trigger return spring tunnel and sear engagement areas ensures a smoother trigger pull. Proper lubrication enhances reliability and maintains the rifle’s performance. Always follow safety guidelines when handling firearms and use materials compatible with gun parts to avoid damage.
Safety Precautions Before Starting the Adjustment
Ensure the rifle is completely unloaded and double-check the chamber. Wear safety glasses and use proper tools to avoid accidental discharge or injury during adjustment.
Ensuring the Rifle is Unloaded and Safe to Work On
Begin by ensuring the rifle is completely unloaded. Remove the magazine and verify the chamber is empty. Use a chamber flag to visually confirm the firearm is safe. Always handle the rifle with the muzzle pointed in a safe direction. Double-check the firearm’s condition before starting any adjustments. If unsure‚ consult the owner’s manual or seek professional guidance to ensure safety throughout the process.
Wearing Protective Gear and Following Proper Procedures
Always wear safety glasses and gloves when working on your rifle to protect yourself from potential debris or accidental discharge. Ensure the rifle is unloaded and secured in a vice or safe working area. Follow proper gunsmithing practices‚ such as avoiding loose clothing or jewelry that could interfere with tools. Work in a well-lit‚ stable environment‚ and keep the muzzle pointed in a safe direction at all times. Never proceed without confirming the firearm is unloaded and safe to handle.

Understanding the Trigger Adjustment Screws
The Ruger American Rifle features adjustment screws for pre-travel‚ overtravel‚ and sear engagement. These screws allow precise customization of trigger pull and reset characteristics for optimal performance.
Identifying the Pre-Travel and Overtravel Adjustment Screws
The pre-travel adjustment screw‚ located nearest the muzzle‚ controls the trigger’s movement before it engages the sear. Turning it clockwise reduces pre-travel‚ while counterclockwise increases it. The overtravel screw‚ situated farther from the muzzle‚ adjusts how much the trigger moves rearward after firing. Proper adjustment ensures a crisp‚ responsive trigger pull without compromising safety. Always refer to the owner’s manual for specific guidance to avoid accidental discharge or malfunction.
Explaining the Role of the Sear Engagement Screw
The sear engagement screw‚ located farthest from the receiver‚ regulates the trigger’s interaction with the sear. Turning it clockwise increases sear engagement‚ enhancing safety by preventing accidental discharge. Counterclockwise reduces engagement‚ lightening the trigger pull. Proper adjustment ensures a smooth‚ crisp trigger without compromising reliability. Over-adjustment can lead to misfires‚ so careful calibration is essential. Always follow manufacturer guidelines to maintain safety and functionality.

Step-by-Step Guide to Adjusting the Trigger
Begin by removing the action from the stock to access the trigger mechanism. Adjust the overtravel and pre-travel screws to achieve your desired trigger pull weight and feel.
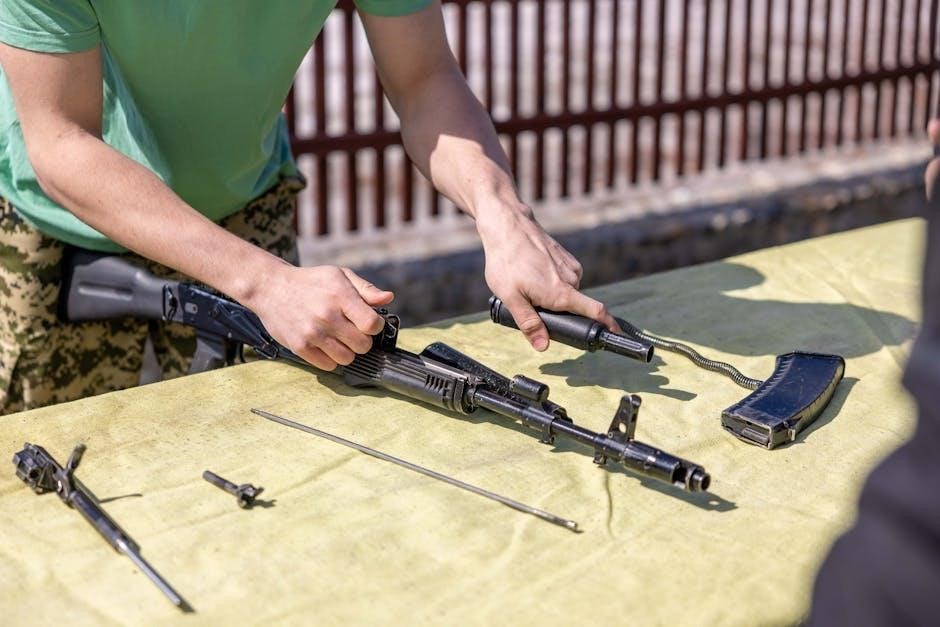
Removing the Action from the Stock
To access the trigger mechanism‚ start by removing the action from the stock. This involves taking out the stock screws located near the front and rear of the action. Gently lift the action away from the stock‚ ensuring no components are damaged. Once removed‚ the trigger system will be exposed for adjustment. Be sure to handle the action carefully and keep it on a clean‚ stable surface during the process. This step is crucial for safely modifying the trigger components.
Accessing and Adjusting the Trigger Mechanism
After removing the action‚ locate the trigger adjustment screws. The screw closest to the muzzle controls overtravel‚ while the screw farther back adjusts pre-travel. Turn these screws clockwise to reduce overtravel or pre-travel‚ ensuring not to over-tighten. Use a screwdriver to make precise adjustments‚ testing the trigger repeatedly for smooth operation. Be cautious not to alter the sear engagement‚ as this can affect safety. Keep the workspace clean and well-lit to avoid losing small parts during the process.

Polishing the Trigger Components for Smoother Operation
Polishing the trigger components enhances functionality. Focus on the trigger return spring tunnel and transfer bar for a smoother pull. Lightly polish with fine grit sandpaper or a polishing stone‚ ensuring surfaces remain clean and free of debris. This process reduces friction and improves the overall trigger feel without altering safety mechanisms. Always work in a well-lit‚ organized workspace to maintain precision and avoid losing small parts.
Polishing the Trigger Return Spring Tunnel
Polishing the trigger return spring tunnel is crucial for reducing friction and ensuring smooth operation. Use a fine-grit sandpaper or polishing stone to gently smooth the interior surfaces. Remove any debris or rough edges that may cause resistance. After polishing‚ apply a small amount of high-quality lubricant to maintain functionality. This step enhances the trigger’s overall performance without compromising safety or reliability. Ensure the area is clean and free of residue before reassembly.
Smoothing the Transfer Bar and Pawl
Smoothing the transfer bar and pawl enhances trigger performance by reducing friction and wear. Use a fine-grit sandpaper or polishing stone to gently buff the surfaces‚ focusing on contact points. This process eliminates sharp edges and burrs‚ ensuring a smoother trigger pull. Be cautious not to over-polish‚ as it may affect functionality. After polishing‚ apply a light coat of lubricant to maintain smooth operation. Properly smoothed components will result in a crisper‚ more consistent trigger reset and improved overall feel.
Reassembling the Rifle After Trigger Adjustment
Reassemble the rifle by reversing the disassembly steps‚ ensuring proper alignment and secure fastening of all components. Reinstall the trigger and action‚ then test functionality.
Properly Reinstalling the Trigger and Action
After adjusting the trigger‚ carefully reinstall the trigger assembly into the receiver‚ ensuring all components align correctly. Secure the action back into the stock using the original screws‚ tightening them evenly. Double-check that all parts are properly seated and fastened to avoid any shifting during use. Once reassembled‚ cycle the action and test the trigger to ensure smooth operation and proper functionality. Verify that the safety operates correctly and the trigger pull meets your adjusted specifications.
Testing the Trigger Functionality
After reassembly‚ test the trigger functionality by dry-firing the rifle to ensure smooth operation. Check for proper trigger reset and consistent pull weight. Verify that overtravel is minimized and the safety operates correctly. Conduct these tests with the rifle unloaded to ensure safety. If adjustments are needed‚ fine-tune the screws as described. Online guides‚ such as those from Gunsite Academy‚ provide additional tips for verifying trigger performance and ensuring optimal functionality.

Troubleshooting Common Issues After Adjustment
Common issues after trigger adjustment include inconsistent pull weight or overtravel. Check screw adjustments and ensure proper reassembly. Consult online guides for detailed solutions to resolve these problems effectively.
Addressing Trigger Pull Issues
Trigger pull issues‚ such as excessive weight or grittiness‚ can arise after adjustment. Ensure the sear engagement screw is properly set without over-tightening. Lightly polishing the sear‚ trigger return spring tunnel‚ and transfer bar can smooth the action. Apply a small amount of high-quality gun oil to moving parts. If problems persist‚ verify that all screws are correctly adjusted and the rifle is reassembled properly. Consulting online guides or seeking professional assistance can help resolve persistent issues effectively.
Fixing Overtravel or Pre-Travel Problems

Overtravel and pre-travel issues can be resolved by adjusting the specific screws. The screw closest to the muzzle adjusts overtravel; turning it in reduces overtravel‚ but over-tightening can prevent firing. For pre-travel‚ adjust the screw near the receiver to set the desired trigger engagement. Ensure adjustments are made incrementally and tested after each change. If problems persist‚ consult detailed online guides or seek professional assistance. Proper adjustment ensures a crisp‚ reliable trigger function without compromising safety.