dribble drive offense pdf

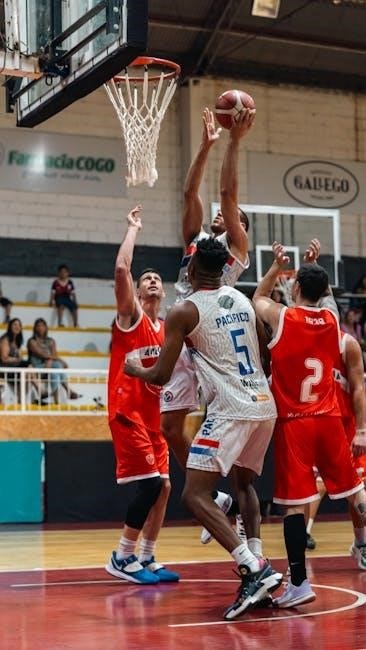
The dribble drive offense is a dynamic, player-oriented system emphasizing movement, spacing, and attacking the rim. Popular across all levels, it focuses on creating scoring opportunities through aggressive drives and smart decisions, adapting to both perimeter and post players while promoting continuous improvement in skill and teamwork.

1.1 Overview of the Dribble Drive Offense (DDO)

The Dribble Drive Offense (DDO) is a fast-paced, aggressive system that emphasizes attacking the basket and creating scoring opportunities through drives. It features four perimeter players and one post player, focusing on spacing, ball movement, and player movement. The offense encourages guards to penetrate and create for themselves or others, while post players seal defenders and finish at the rim. It thrives on teamwork, decision-making, and adaptability, making it effective at all competitive levels.

1.2 History and Evolution of the DDO

The Dribble Drive Offense (DDO) emerged in the early 2000s, popularized by coaches like John Calipari and Vance Walberg. It evolved from motion offenses, emphasizing penetration and spacing. Initially used in college basketball, it spread to high schools and international levels due to its simplicity and effectiveness. Over time, it incorporated new strategies, such as defensive complementarity and skill development drills, making it a versatile and modern basketball system.

1.3 Key Concepts and Principles

The Dribble Drive Offense (DDO) is centered around player movement, spacing, and attacking the rim. It emphasizes continuous movement, smart decision-making, and creating scoring opportunities through drives and perimeter play; Players must be adept at reading defenses, making quick passes, and finishing at the basket. The system relies on adaptability, allowing it to adjust to various player skills and defensive strategies while maintaining its core principles of aggression and fluidity.

Key Strategies and Tactics

The dribble drive offense relies on aggressive drives, smart spacing, and quick decisions to exploit defensive gaps. It emphasizes attacking the rim, creating scoring opportunities, and maintaining fluidity in player movement. Coaches often integrate transition basketball and half-court sets to maximize efficiency, making it a versatile system for teams with versatile players.

2.1 Ball Movement and Player Movement

In the dribble drive offense, ball movement and player movement are critical for creating scoring opportunities. Players are encouraged to attack the rim decisively, drawing defenders and creating open lanes for drives or kicks. Quick, precise passes and continuous motion off the ball are essential to exploit defensive gaps. This dynamic approach emphasizes spacing, cutting, and fluid transitions, allowing players to thrive in a fast-paced, aggressive offensive system that rewards smart decisions and teamwork.

2.2 Transition Offense and Fast Break Opportunities

The dribble drive offense thrives in transition, utilizing quick ball movement and player movement to exploit defensive gaps. Guards are encouraged to push the ball up the court rapidly, creating open lanes for drives or uncontested shots. This fast-paced approach forces defenses to react quickly, often leading to fouls or open scoring opportunities. Transition offense is a cornerstone of the DDO, emphasizing speed, aggressiveness, and smart decision-making to capitalize on defensive vulnerabilities.

2.3 Defensive Strategies to Complement the DDO

Defensive strategies for the dribble drive offense focus on aggressive pressure and help defense to disrupt opponents’ rhythm. Players are encouraged to force turnovers through active hands and positioning, creating fast-break opportunities. The defense must balance individual responsibility with rotational support, ensuring gaps are filled quickly. This approach complements the DDO by generating transition scoring chances while protecting the paint and contesting perimeter shots effectively.

Player Roles and Responsibilities

Players in the dribble drive offense have distinct roles: the point guard directs the offense, perimeter players attack and create, while post players set screens and finish.

3.1 The Role of the Point Guard

The point guard is the floor leader, responsible for directing the offense and making key decisions. They set the tempo, ensure smart passing, and create opportunities for teammates. Their ability to pass up court when a player is open and transition smoothly into the dribble drive offense is crucial for maintaining offensive flow and rhythm, making them a pivotal figure in the team’s success.

3.2 The Role of Perimeter Players

Perimeter players are essential for spacing and creating offensive opportunities. They must excel in attacking the rim, shooting from the outside, and making sharp cuts. Their ability to read defenses and make quick decisions is vital, as they often initiate the drive or create passing options. Effective perimeter play enhances the offense’s unpredictability and ensures continuous movement, making it harder for defenses to anticipate their next action.

3.3 The Role of Post Players

Post players serve as the backbone of the offense, providing scoring opportunities and rebounding. They must seal defenders effectively, create space, and finish strong at the rim. Their ability to pass out of double-teams and set screens is crucial. Post players also free up perimeter shooters by drawing defensive attention, making them a vital component in maintaining offensive balance and versatility.

Drills and Practice Techniques

Drills focus on improving ball handling, passing, and decision-making. Players practice attacking the rim, executing backdoor cuts, and refining post moves to enhance overall offensive efficiency.

4.1 Dribble Drive Offense Drills

Drills for the dribble drive offense focus on improving ball handling, decision-making, and attacking the rim. Players practice stationary dribbling, figure-eight drills, and cone exercises to enhance agility. Shooting and finishing drills, such as layup lines and catch-and-shoot exercises, are also essential. Additionally, 1-on-1 and 3-on-3 half-court games simulate game scenarios, emphasizing quick decisions and teamwork. These drills build the skills needed to excel in the fast-paced, dynamic nature of the DDO.

4.2 Perimeter Player Skill Development

Perimeter players in the dribble drive offense must excel in ball handling, shooting, and decision-making. Drills focus on improving crossovers, behind-the-back dribbles, and step-back moves; Shooting exercises emphasize catch-and-shoot and off-the-dribble accuracy. Players also practice attacking gaps and making sharp passes. Figure-eight and cone drills enhance agility and control. These skills enable perimeter players to thrive in the DDO, creating scoring opportunities and maintaining offensive flow.

4.3 Post Player Skill Development

Post players in the dribble drive offense focus on developing essential skills like positioning, sealing, and finishing. Drills emphasize footwork, drop steps, and jump hooks to create scoring opportunities. Players also work on rebounding and outlet passes to transition into the offense. These skills ensure post players can contribute effectively within the DDO framework, complementing perimeter play and maintaining offensive balance.

Advantages of the Dribble Drive Offense

The dribble drive offense offers enhanced scoring opportunities, promotes player development, and provides flexibility. It encourages aggressive drives, smart decision-making, and adapts to various skill levels, ensuring balanced offense.

5.1 Increased Scoring Opportunities

The dribble drive offense excels at creating high-percentage scoring chances by attacking the rim aggressively. Players are encouraged to drive and draw fouls, leading to free throws. The offense’s fluidity allows for open shots and easy baskets, while its emphasis on spacing and movement generates opportunities for both perimeter and post players to score effectively in a fast-paced, dynamic system.

5.2 Improved Player Development

The dribble drive offense emphasizes skill enhancement, fostering better ball handling, decision-making, and court vision. Players develop the ability to attack the rim, create for others, and improve shooting accuracy. The system’s focus on individual creativity and versatility accelerates overall basketball growth, preparing athletes for higher levels of competition while building confidence and a well-rounded skill set through dynamic, engaging drills and game situations.

5.3 Flexibility and Adaptability

The dribble drive offense offers unmatched flexibility, allowing teams to adapt to various opponents and game situations. Coaches can integrate motion offense elements, screens, and cuts, tailoring strategies to exploit defensive weaknesses. Its adaptability ensures sustained effectiveness against diverse defensive schemes, making it a versatile system for teams seeking to maximize their offensive potential while maintaining competitive edge and unpredictability throughout the game.

Variations and Adjustments

The dribble drive offense allows for various adjustments, such as incorporating motion plays and adapting to defensive strategies, ensuring effectiveness against different opponents and game scenarios.

6.1 Motion Offense Variations

The dribble drive motion offense integrates fluid player movement and spontaneous scoring opportunities. It features four perimeter players, emphasizing quick passes and cuts to create open shots or driving lanes. Variations include incorporating ball screens, backdoor cuts, and dynamic rotations to exploit defensive gaps. Coaches like Vance Walberg emphasize these motion elements to enhance offensive flow, creating mismatches and disrupting defensive structures while maintaining the core principles of the dribble drive system.

6.2 Adjustments for Different Opponents

Coaches often tailor the dribble drive offense to counter opponents’ defensive strategies. Against pressure defense, faster transitions and sharper cuts are emphasized. Versus zone defenses, perimeter shooting and high-low post play are highlighted. Adjustments may include modifying ball screen placement or exploiting defensive weaknesses through specific cuts and drives. Flexibility in the system allows teams to adapt while maintaining offensive rhythm and player movement integrity.

6.3 Incorporating Screens and Cuts

Incorporating screens and cuts enhances the dribble drive offense by creating open lanes and misdirection. Ball screens at the top of the key free up guards for drives, while backdoor cuts exploit overplaying defenders. Sharp, timely cuts to the basket or perimeter force defensive rotations, creating gaps for attackers. These elements add unpredictability, making the offense harder to defend and maximizing scoring potential through intelligent player movement and spacing.

Expert Insights and Coaching Tips

Experienced coaches like Vance Walberg emphasize mastering the dribble drive fundamentals, while John Calipari’s system highlights the importance of spacing and decision-making. Coaches stress the value of backdoor cuts and ball screen execution to maximize offensive efficiency and player development.

7.1 Coaching the Dribble Drive Offense

Coaching the dribble drive offense requires emphasizing fundamentals like ball handling, spacing, and decision-making. Vance Walberg’s clinics highlight the importance of player movement and backdoor cuts. Coaches should focus on developing perimeter skills and ensuring players understand their roles. Encourage aggressive drives and smart passes, while stressing the value of continuous improvement through drills and game-like scenarios. Effective communication and adaptability are key to mastering this dynamic system.

7.2 Insights from Successful Coaches

Successful coaches like Vance Walberg emphasize the importance of player movement and backdoor cuts in the dribble drive offense. John Calipari’s approach highlights aggressive drives and smart decision-making. Coaches stress the value of fundamentals, such as ball handling and spacing, while encouraging continuous improvement through skill-specific drills. Adaptability and effective communication are key to maximizing the offense’s potential, as noted by experienced coaches in various basketball programs.

7.3 Common Mistakes to Avoid

Common mistakes in the dribble drive offense include overdriving, which clogs the paint, and neglecting post players, leading to unbalanced scoring. Forgetting backdoor cuts and poor ball movement are additional pitfalls. Coaches must emphasize spacing, timing, and fundamental skills to avoid stagnation. Players should avoid forcing drives and ensure defensive transitions are seamless. Addressing these errors through drills and repetition is crucial for maximizing the offense’s effectiveness.

Resources and Further Learning

Explore PDF guides, eBooks, and online courses for in-depth analysis. Utilize video analysis and game footage to enhance understanding of the dribble drive offense.

8.1 Recommended PDF Guides and eBooks

Discover comprehensive PDF guides and eBooks detailing the dribble drive offense. Resources like “Dribble Drive Offense Drills” and “Vance Walberg’s Dribble Drive Motion Offense” offer expert strategies, drills, and practical insights for coaches. These materials provide detailed diagrams, play breakdowns, and coaching tips to master the offense, ensuring players develop essential skills and teamwork effectively.

8.2 Online Courses and Tutorials

Enhance your understanding of the dribble drive offense with online courses and tutorials. Platforms offer detailed video lessons, drills, and strategies from experienced coaches. Vance Walberg’s dribble drive motion offense course is highly recommended, providing step-by-step guidance. These resources are ideal for coaches and players seeking to master the offense’s intricacies, from ball movement to player development, ensuring effective implementation on the court.

8.3 Video Analysis and Game Footage

Video analysis and game footage are invaluable tools for mastering the dribble drive offense. Coaches and players can study real-game applications, analyze player movement, and identify execution flaws. Platforms offering game footage, such as college and professional games, provide insights into how top-tier teams implement the DDO. This visual learning enhances understanding and helps refine strategies for effective on-court execution and adaptation.

The dribble drive offense is a versatile, dynamic system that enhances scoring and player development through aggressive drives and smart spacing, making it a popular choice across all basketball levels.

9.1 Recap of the Dribble Drive Offense

The dribble drive offense is a dynamic, player-oriented system that emphasizes ball movement, spacing, and attacking the rim. It relies on perimeter players creating scoring opportunities through aggressive drives and smart decisions. This offense fosters skill development, teamwork, and adaptability, making it effective at all levels of basketball. Its flexibility allows coaches to tailor strategies to their team’s strengths, ensuring continuous improvement and success on the court.

9.2 Final Thoughts and Encouragement

The dribble drive offense is a powerful tool for teams seeking to enhance scoring, skill development, and teamwork. Coaches and players are encouraged to embrace its flexibility and adaptability, as it caters to various skill levels and playing styles. By mastering the fundamentals and committing to consistent practice, teams can unlock the full potential of this dynamic offense. Stay dedicated, and the rewards on the court will follow.

actionable insights with amazon quicksight pdf free download

Amazon QuickSight empowers businesses to unlock data-driven decision-making with its cloud-native, scalable, and machine learning-powered analytics. This guide provides a hands-on approach to transforming data into actionable insights, leveraging embedded dashboards and interactive visualizations. Download the free PDF to explore how QuickSight simplifies business intelligence and fosters data-driven strategies for organizations of all sizes.

What is Amazon QuickSight?

Amazon QuickSight is a cloud-native business intelligence (BI) tool designed to deliver fast, scalable, and secure insights. It leverages machine learning to provide advanced analytics and supports seamless integration with AWS services. Users can create interactive dashboards and perform ad-hoc analysis with ease, enabling data-driven decision-making.

As part of Amazon Web Services (AWS), QuickSight offers robust capabilities for embedded analytics, making it ideal for organizations looking to integrate data visualizations into their applications. Its intuitive interface and powerful features make it a versatile solution for transforming raw data into actionable insights.

The Importance of Actionable Insights in Business Analytics

Actionable insights are crucial for driving informed decisions and improving business outcomes. They enable organizations to identify trends, optimize operations, and respond to market changes effectively. By leveraging tools like Amazon QuickSight, businesses can transform raw data into meaningful, data-driven strategies.

Actionable insights foster collaboration across teams, ensuring everyone aligns with strategic goals. They also empower organizations to anticipate challenges and capitalize on opportunities, making them indispensable in today’s fast-paced business environment.

Key Features of Amazon QuickSight

Amazon QuickSight offers cloud-native BI capabilities, machine learning-powered insights, and embedded analytics. It delivers scalable, interactive dashboards, enabling seamless data exploration and visualization for informed decision-making.

Cloud-Native BI Tool Capabilities

Amazon QuickSight is a fully managed, cloud-native BI service that enables fast and scalable analytics. It supports ad-hoc analysis, integrates seamlessly with AWS services, and delivers insights rapidly. Its pay-per-session pricing model makes it cost-effective for businesses of all sizes. QuickSight’s cloud-native architecture allows it to handle large datasets efficiently, providing users with interactive and responsive dashboards. With embedded analytics capabilities, it empowers organizations to integrate visualizations directly into applications, ensuring data-driven decision-making across teams.

Machine Learning-Powered Insights

Amazon QuickSight leverages machine learning to uncover hidden patterns and trends in data, delivering automated insights. Features like forecasting and anomaly detection enable predictive analytics, helping businesses anticipate future trends. ML-powered insights provide recommendations and key performance indicators, enhancing decision-making. Users can easily incorporate these insights into dashboards, making them accessible to all stakeholders. The integration of machine learning capabilities ensures that organizations can derive meaningful and actionable intelligence from their data, driving informed strategies and operational efficiency.

Embedded Analytics and Interactive Dashboards

Amazon QuickSight enables seamless integration of dashboards into applications, allowing users to access data insights without leaving their workflow. Embedded analytics empowers organizations to deliver interactive, real-time data exploration; Dashboards are customizable, supporting advanced analytics and fostering collaboration. Users can interact with visualizations to uncover detailed trends and patterns. This capability enhances decision-making by making insights accessible to everyone, ensuring data-driven strategies are actionable and impactful across the organization.

Generating Actionable Insights with Amazon QuickSight

Amazon QuickSight empowers businesses to transform raw data into meaningful insights using machine learning and interactive dashboards. Its cloud-native platform enables scalable analytics, driving data-driven decision-making and fostering innovation. Download the free PDF guide to explore how QuickSight simplifies the process of generating actionable insights, helping organizations make informed decisions with ease and precision.

Transforming Raw Data into Meaningful Insights

Amazon QuickSight excels at converting raw data into actionable insights, enabling businesses to make informed decisions. Its advanced analytics and machine learning capabilities identify patterns, trends, and anomalies, providing a deeper understanding of datasets. With cloud-native scalability, QuickSight processes large volumes of data efficiently, ensuring insights are both accurate and timely. The platform’s intuitive interface and interactive dashboards empower users to explore data visually, uncovering hidden opportunities and driving strategic outcomes. Download the free PDF guide to learn how to harness these capabilities effectively.

Forecasting and Trend Analysis with ML Insights

Amazon QuickSight leverages machine learning to deliver powerful forecasting and trend analysis, enabling businesses to anticipate future outcomes and make data-driven decisions. By analyzing historical data, QuickSight identifies patterns and trends, providing actionable insights. Its ML-powered predictions help organizations stay ahead of market shifts and optimize operations. The platform’s advanced analytics ensure accurate forecasts, while interactive dashboards make complex data accessible. Download the free PDF guide to explore how QuickSight’s ML capabilities can transform your forecasting processes and drive business success.

Building Interactive and Storytelling Reports

Amazon QuickSight enables users to create engaging, interactive reports that tell compelling stories with data. Its intuitive interface allows for the design of dynamic dashboards that visualize trends, patterns, and insights. By combining rich visualizations with narrative techniques, businesses can communicate complex data simply. The platform’s scalability ensures seamless performance, even with large datasets. These interactive reports empower stakeholders to explore data deeply and make informed decisions. Download the free PDF guide to learn how QuickSight simplifies the creation of storytelling reports that drive actionable outcomes.

Embedded Analytics and Dashboards

Amazon QuickSight enables seamless integration of dashboards into applications, providing embedded analytics that support advanced insights. Organizations can derive actionable insights from these dashboards, enhancing decision-making. Download the free PDF guide to explore how embedded analytics can elevate your business strategies with interactive and scalable solutions.

Seamless Integration of Dashboards in Applications

Amazon QuickSight simplifies embedding dashboards into applications using Java, JavaScript, or Python. This seamless integration allows businesses to deliver actionable insights directly within their platforms. Users can configure permissions, generate embedding URLs, and embed dashboards effortlessly. The process is streamlined to ensure scalability and performance. By integrating dashboards, organizations can provide real-time analytics to end-users, enhancing decision-making. This capability is a cornerstone of QuickSight’s value proposition, making it a powerful tool for embedded analytics. Download the free PDF guide to learn more about these capabilities.

Deriving Insights from Embedded Dashboards

Embedded dashboards in Amazon QuickSight empower users to derive actionable insights seamlessly. These dashboards support advanced analytics, enabling real-time data exploration and interactive storytelling. By embedding them, businesses can unlock hidden patterns, forecast trends, and solve complex problems. The integration of machine learning insights further enhances decision-making capabilities. Users can access these dashboards within their applications, ensuring data-driven strategies are always accessible. This feature makes QuickSight a robust tool for organizations aiming to maximize the value of their data. Download the free PDF guide to explore these capabilities in depth.

Free Resources and Downloads

Access a free PDF guide on actionable insights with Amazon QuickSight, along with color images and diagrams. Download now to enhance your data visualization skills.

Downloading the Free PDF Guide

Access the complimentary PDF guide to explore actionable insights with Amazon QuickSight. This comprehensive resource offers practical, hands-on guidance for transforming data into meaningful insights. Whether you’re analyzing trends, creating visualizations, or leveraging machine learning capabilities, the guide provides detailed steps and best practices. Additionally, it includes access to color images and diagrams to enhance your learning experience. Download the DRM-free PDF instantly and start mastering QuickSight’s powerful features for data-driven decision-making.

  • Comprehensive guide for data visualization and analysis
  • Includes color images and diagrams
  • Perfect for beginners and advanced users

Accessing Color Images and Diagrams

Enhance your learning experience with high-quality color images and diagrams from the guide. These visuals provide clear illustrations of QuickSight’s features, dashboards, and workflows. Available as a separate download, they complement the PDF guide perfectly. Access the images to gain a better understanding of data visualization techniques and embedded analytics. These resources are designed to help you maximize your use of Amazon QuickSight for actionable insights.

  • High-resolution visuals for enhanced clarity
  • Complements the free PDF guide
  • Available for instant download

Best Practices for Using Amazon QuickSight

Optimize performance by managing data sources efficiently and ensuring proper permissions. Leverage ML insights for forecasting and scalability in dashboards. Implement regular updates and backups.

  • Efficient data management enhances scalability.
  • Secure permissions protect sensitive information.

Managing Data Sources and Permissions

Effectively managing data sources and permissions is crucial for secure and efficient analytics with Amazon QuickSight. Ensure data sources are properly configured and validated to maintain accuracy. Assign permissions carefully, restricting access to sensitive data while enabling authorized users to perform necessary tasks. Regularly audit data sources and permissions to comply with organizational policies and data governance standards. This ensures scalability, security, and optimal performance for actionable insights. Proper management also enhances collaboration and trust in the analytics process.

  • Validate data sources for accuracy.
  • Restrict access to sensitive information.
  • Regular audits ensure compliance and security.

Optimizing Dashboards for Scalability

Optimizing dashboards in Amazon QuickSight ensures seamless performance as data volumes grow. Leverage cloud-native scalability to handle large datasets without compromising speed. Simplify visualizations, use aggregated data, and implement filtering strategies to enhance performance. Regularly monitor usage and adjust settings to align with organizational needs. By optimizing dashboards, businesses can deliver actionable insights efficiently, even at scale, while maintaining a user-friendly experience. This ensures robust performance and scalability for growing data demands.

  • Leverage cloud scalability for large datasets.
  • Simplify visualizations for faster performance.
  • Monitor and adjust settings for optimal results.

Amazon QuickSight unlocks business potential by delivering scalable, ML-driven insights. Download the free PDF guide to master actionable analytics and transform data into strategic decision-making tools.

Unlocking Business Potential with Amazon QuickSight

Amazon QuickSight empowers businesses to unlock their full potential by transforming raw data into actionable insights. With its cloud-native capabilities and machine learning-powered analytics, QuickSight enables organizations to make data-driven decisions at scale. Its embedded dashboards and interactive visualizations simplify complex data, fostering collaboration and innovation. By leveraging QuickSight, businesses can drive growth, optimize operations, and deliver impactful results. Download the free PDF guide to explore how QuickSight can elevate your analytics strategy and empower your team to achieve success.

the power of psalms pdf free download

The Psalms are ancient spiritual texts, deeply rooted in religious traditions, offering guidance for healing, prosperity, and protection. Anna Riva’s work highlights their mystical power, providing rituals and prayers for modern spirituality. The Power of Psalms PDF is a free resource that explores these sacred writings, offering practical applications for spiritual growth and daily life, making it a valuable tool for seekers of divine wisdom and holistic well-being.

Overview of the Book and Its Significance

The Power of Psalms is a revered spiritual guide that unlocks the mystical and practical uses of the Psalms, offering readers a pathway to healing, prosperity, and divine connection. Authored by Anna Riva, this book is a comprehensive resource that blends ancient wisdom with modern applications, making it accessible to seekers of all faiths. The text explores the historical significance of the Psalms, their role in rituals, and their ability to address life’s challenges. Available as a free PDF download, this book is a treasure trove of spiritual knowledge, providing step-by-step guidance for reciting Psalms, performing rituals, and harnessing their transformative power for personal growth and well-being. Its significance lies in its ability to bridge tradition and contemporary spirituality.

Why the Psalms Hold Spiritual and Mystical Power

The Psalms are revered for their profound spiritual and mystical power, as they are believed to carry divine energy and wisdom. Composed by figures like King David, these sacred texts are infused with emotional depth and spiritual insight, making them a universal tool for prayer, meditation, and ritual. Their power lies in their ability to connect individuals with the divine, offering solace, guidance, and transformation. The Psalms are often used to address specific life challenges, such as healing, protection, and prosperity, and are considered dynamic instruments for spiritual growth. Their mystical power is further enhanced by their use in candle-burning rituals and devotional practices, as outlined in resources like Anna Riva’s Power of Psalms, making them a timeless and versatile spiritual resource.

Understanding the Psalms

The Psalms are sacred texts composed primarily by King David, offering prayers, hymns, and reflections that capture human emotions and divine connection. Their historical and spiritual significance lies in their ability to express faith, hope, and wisdom across generations.

Historical Background and Composition

The Psalms are a collection of sacred poems and prayers that form a central part of ancient Jewish and Christian worship. Composed over several centuries, many are attributed to King David, who is traditionally credited with authorship of 73 Psalms. The earliest Psalms likely date back to the time of the First Temple, while others were written during the Babylonian exile and the Second Temple period. These texts reflect a wide range of emotions, from joy and praise to lament and repentance, capturing the spiritual journey of individuals and communities. The Psalms’ composition is deeply intertwined with Israel’s history, making them a cornerstone of religious and cultural identity.

The Role of King David in the Psalms

King David, a central figure in the Psalms, is traditionally credited with authorship of many of these sacred texts. His life experiences, from shepherding to kingship, deeply influenced the emotional and spiritual depth of the Psalms. David’s compositions reflect his intimate relationship with God, capturing moments of joy, repentance, and trust. His Psalms often served as prayers and songs of worship, resonating with believers across generations. The PDF highlights how David’s works embody the transformative power of the Psalms, offering guidance for healing, protection, and spiritual growth. His legacy endures as a testament to the enduring relevance of these ancient writings in modern spirituality and practice.

The Power of Psalms in Modern Spirituality

The Psalms remain a vital resource in modern spirituality, offering teachings for healing, prosperity, and protection. Their timeless wisdom continues to inspire and guide seekers of truth and peace, making the Power of Psalms PDF a cherished tool for contemporary spiritual practices.

Using Psalms for Healing and Health

The Psalms are revered for their healing properties, offering comfort and restoration in times of physical or emotional distress. Anna Riva’s teachings emphasize specific Psalms, such as Psalm 1 for stress relief and Psalm 23 for comfort, to address ailments. By reciting these sacred verses, individuals can channel divine energy to alleviate suffering and promote well-being. The Power of Psalms PDF provides detailed rituals and prayers, guiding users to harness their transformative power. Many find solace in these ancient texts, believing they bridge the spiritual and physical realms, fostering holistic healing and peace; This timeless wisdom continues to empower modern seekers of health and harmony.

Applying Psalms for Prosperity and Protection

The Psalms are powerful tools for attracting prosperity and safeguarding against negativity. Anna Riva’s teachings highlight specific verses, such as Psalm 1 for financial success and Psalm 2 for divine protection. By reciting these Psalms with intention, individuals can align with divine energies to manifest abundance and create protective barriers. The Power of Psalms PDF offers practical rituals, such as candle burning and prayers, to amplify their effects. Many believe these ancient texts hold the key to unlocking blessings and warding off misfortune. Whether seeking career advancement or personal safety, the Psalms provide timeless wisdom and spiritual guidance for achieving prosperity and protection in all aspects of life.

Practical Applications of the Psalms

The Psalms offer versatile spiritual tools for daily life, enabling users to enhance meditation, perform rituals, and address specific needs like love, success, or protection through focused recitation.

How to Recite Psalms for Specific Purposes

Reciting Psalms for specific purposes requires intention, focus, and faith. Start by identifying the Psalm that aligns with your need, such as Psalm 1 for timely delivery or Psalm 23 for comfort. Anoint candles or oils with prayer, then recite the Psalm aloud with conviction. For healing, Psalm 37 is often used, while Psalm 121 offers protection. Anna Riva’s guide suggests pairing recitation with rituals like burning red candles to attract positive energy or using healing oils for physical ailments. Repeat the Psalm multiple times, visualizing your desired outcome. This practice, rooted in ancient traditions, channels the Psalms’ mystical power to bring spiritual and tangible results, fostering a deeper connection with the divine.

Rituals and Prayers Using Psalms

The Book of Psalms, a collection of sacred songs and prayers, holds profound spiritual and historical significance. Composed by figures like King David, it reflects a wide range of human emotions and divine connections. Its verses are versatile, addressing themes from joy and gratitude to sorrow and repentance. Anna Riva’s interpretation highlights their mystical power, offering practical uses for healing, protection, and prosperity. The Psalms serve as a bridge between ancient spirituality and modern practices, making them a timeless resource for seekers of wisdom and solace. Their enduring relevance lies in their ability to inspire and guide individuals through life’s challenges, fostering a deeper connection to the divine.

Anna Riva’s Contributions

Anna Riva’s work illuminates the mystical power of Psalms, offering rituals, candle burning, and magical practices. Her teachings bridge ancient spirituality with modern applications, empowering individuals to harness divine energy for healing, prosperity, and protection, making her a pivotal figure in contemporary spiritual practices.

Anna Riva’s Interpretation of the Psalms

Anna Riva’s interpretation of the Psalms unlocks their mystical and spiritual potential, connecting ancient wisdom with modern practices. She explores their use in healing, prosperity, and protection, offering practical guidance. Riva’s work emphasizes the Psalms as versatile tools for spiritual growth, love, success, and divine connection. Her teachings provide rituals, prayers, and candle-burning techniques, making the Psalms accessible for everyday life. The Power of Psalms PDF highlights her approach, detailing how each Psalm can be applied to specific needs, from relieving tensions to attracting positive energies. Her insights empower individuals to harness the sacred power of the Psalms for personal transformation and holistic well-being.

Her Approach to Candle Burning and Magic

Anna Riva’s approach to candle burning and magic integrates the Psalms into a powerful spiritual practice. She teaches how to combine specific Psalms with candle rituals to amplify intentions for love, prosperity, and protection. Riva emphasizes the importance of color selection, corresponding to desired outcomes, such as red for attraction or green for abundance. Her methods include anointing candles with sacred oils and reciting Psalms to invoke divine energy. The Power of Psalms PDF details these rituals, offering step-by-step guidance for practitioners. Riva’s techniques blend traditional mysticism with practical magic, making her teachings a cornerstone for those seeking to enhance their spiritual practices and manifest positive change in their lives.

Downloading the Power of Psalms PDF

The Power of Psalms PDF is readily available for free download from sources like Internet Archive and PDFDrive.com. It offers Anna Riva’s insights into Psalms-based rituals and magical practices, providing a comprehensive guide for spiritual growth and practical applications.

Where to Find the Free PDF Version

The Power of Psalms PDF is available for free download from various online platforms. Websites like Internet Archive and PDFDrive.com offer direct access to Anna Riva’s seminal work. Additionally, platforms such as Archive.org and Pdfcoffee.com provide downloadable versions, ensuring easy access to this spiritual resource. These sites allow users to download the PDF without registration or payment, making it widely accessible. The free version includes all 150 Psalms, along with Riva’s interpretations and practical applications for healing, prosperity, and protection. This convenient access enables individuals to explore the mystical power of the Psalms for personal growth and spiritual enrichment.

How to Use the PDF for Spiritual Growth

The Power of Psalms PDF serves as a comprehensive guide for spiritual growth, offering practical methods to harness the Psalms’ transformative power. Begin by setting clear intentions, such as healing, prosperity, or protection. Meditate on specific verses, allowing their meanings to resonate deeply. Recite Psalms aloud during daily prayers or rituals, focusing on their emotional and spiritual resonance. For example, Psalm 23 is often used for comfort, while Psalm 1 is believed to attract positive outcomes. Incorporate candle burning rituals, as suggested by Anna Riva, to amplify intentions. Regular reflection and application of these teachings can enhance spiritual connection and foster personal growth, making the PDF an invaluable resource for holistic well-being.

reaction mechanism in organic chemistry pdf

Reaction mechanisms in organic chemistry describe the step-by-step pathways by which reactants are transformed into products. Understanding these mechanisms is fundamental to predicting and controlling reaction outcomes, enabling the design of efficient synthetic routes and optimizing chemical processes.

1.1 Definition and Importance of Reaction Mechanisms

A reaction mechanism in organic chemistry is a detailed, step-by-step description of how reactants are transformed into products. It outlines the sequence of bond-breaking and bond-forming processes, including the formation of intermediates and transition states. Understanding reaction mechanisms is crucial for predicting reaction outcomes, optimizing synthetic routes, and explaining selectivity and stereospecificity. Mechanisms provide insights into the energetics of reactions, helping chemists design more efficient and sustainable processes. They also guide the development of new reagents and catalysts, enabling the creation of complex molecules in organic synthesis. Without a clear understanding of mechanisms, controlling and scaling up chemical reactions would be challenging, making their study essential in both academic research and industrial applications.

1.2 Historical Development of Reaction Mechanism Studies

The study of reaction mechanisms in organic chemistry has evolved significantly over the past century. Early investigations focused on classifying reactions and identifying intermediates, with pioneers like William Henry Perkin contributing foundational work. The development of electronic theory in the early 20th century provided tools to explain reaction pathways, while later advancements in spectroscopy and computational methods allowed for detailed analysis. Modern approaches, including theoretical models and experimental techniques, have refined our understanding, enabling precise predictions of reaction outcomes. This historical progression has transformed reaction mechanisms from empirical observations to a sophisticated science, underpinning modern organic synthesis and industrial chemistry.

Types of Reaction Mechanisms

Organic reactions can be classified into several types, including addition, elimination, substitution, and cycloaddition reactions, each involving distinct bond-forming and bond-breaking processes.

2.1 Addition Reactions

Addition reactions involve the combination of two or more molecules to form a single product, often through the breaking and forming of new bonds. These reactions are fundamental in organic chemistry, as they allow for the construction of complex molecules from simpler starting materials. A common example is the addition of hydrogen bromide (HBr) to alkenes, resulting in the formation of alkyl bromides; Similarly, alkenes can undergo addition with bromine (Br₂), leading to dibromides. Addition reactions can proceed via different mechanisms, such as electrophilic addition or nucleophilic addition, depending on the reactants and conditions. These reactions are widely used in organic synthesis, enabling the introduction of specific functional groups and the creation of stereochemically defined products. Understanding the mechanisms of addition reactions is crucial for controlling regio- and stereoselectivity in synthetic processes.

2.2 Elimination Reactions

Elimination reactions involve the removal of atoms or groups from adjacent atoms in a molecule, resulting in the formation of a double bond or other unsaturated structure. These reactions are essential in organic chemistry for generating alkenes, alkynes, and other unsaturated compounds. A common example is the dehydrohalogenation of alkyl halides, where a hydrogen atom and a halide ion are eliminated to form an alkene. The mechanism typically involves the formation of a carbocation intermediate or proceeds through a concerted process, as seen in the E2 mechanism. Elimination reactions are influenced by factors such as temperature, base strength, and steric effects, which determine the extent of elimination and the stability of the resulting product. Understanding these reactions is vital for controlling the formation of desired unsaturated compounds in organic synthesis.

2.3 Substitution Reactions

Substitution reactions involve the replacement of a leaving group in a molecule with another atom or group. These reactions are fundamental in organic chemistry, often involving nucleophiles attacking electrophilic centers. The mechanism can proceed via different pathways, such as SN1 (unimolecular nucleophilic substitution) or SN2 (bimolecular nucleophilic substitution). In SN1, a carbocation intermediate forms, while SN2 involves a concerted backside attack. Factors like solvent, leaving group ability, and steric hindrance influence the reaction pathway. Substitution reactions are crucial in synthesizing a wide range of organic compounds, including pharmaceuticals and agrochemicals. Understanding these mechanisms allows chemists to predict and control reaction outcomes, making them essential in organic synthesis and drug design.

2.4 Cycloaddition Reactions

Cycloaddition reactions are pericyclic processes involving the concerted formation of a cyclic structure through the interaction of molecular orbitals. A classic example is the [4+2] Diels-Alder reaction, which forms six-membered rings. These reactions are highly stereospecific, with orbital symmetry playing a critical role. The transition state involves the interaction of the highest occupied molecular orbital (HOMO) of one reactant with the lowest unoccupied molecular orbital (LUMO) of another. Cycloadditions are versatile tools in organic synthesis, enabling the construction of complex ring systems. They are often used to synthesize natural products and pharmaceuticals. Reaction conditions, such as temperature and solvent, can influence the regio- and stereochemical outcomes, making these reactions valuable for precision synthesis.

Key Concepts in Reaction Mechanisms

Reaction mechanisms involve intermediates and transition states, guiding the pathway from reactants to products. Intermediates are reactive species formed during the process, while transition states are energy maxima.

3.1 Reaction Intermediates

Reaction intermediates are transient species formed during the progression of a chemical reaction. They are neither the starting materials nor the final products but play a critical role in the mechanism. Common intermediates in organic chemistry include carbocations, radicals, and carbanions. These species are highly reactive and short-lived, often forming and reacting quickly. Intermediates can be identified through experimental techniques such as spectroscopy or isotopic labeling, and their presence is inferred from kinetic and stereochemical data. Understanding intermediates is essential for elucidating reaction pathways and designing synthetic strategies. For instance, carbocations are key intermediates in substitution and elimination reactions, while radicals are central to certain polymerization and oxidation processes. The study of intermediates provides insights into the energetic and kinetic aspects of reactions, aiding in the optimization of organic syntheses.

  • Examples of intermediates: carbocations, radicals, carbanions.
  • Intermediates are identified using spectroscopy, isotopic labeling, and kinetic studies.
  • They are crucial for understanding reaction pathways and designing synthetic strategies.

3.2 Transition State Theory

Transition State Theory (TST) is a cornerstone in understanding reaction mechanisms, describing the highest energy state along the reaction pathway. It explains that reactants pass through a transient transition state before forming products. This theory posits that the transition state is a saddle point on the potential energy surface, representing the most critical point in the reaction. The energy required to reach this state determines the reaction rate. TST is widely applied to predict reaction rates and mechanisms, aiding in the design of catalysts and synthetic routes. Computational methods, such as quantum mechanics, are often used to model transition states, providing insights into their structure and stability. By understanding transition states, chemists can better control reaction outcomes and optimize processes in organic synthesis.

  • TST explains the highest energy state in a reaction pathway.
  • Transition states are modeled using computational methods like quantum mechanics.
  • Understanding transition states aids in catalyst design and reaction optimization.

Modern Methods for Studying Reaction Mechanisms

Modern methods include computational modeling and experimental techniques like cyclic voltammetry to study reaction mechanisms, providing insights into energy surfaces and intermediate states.

4.1 Computational Methods

Computational methods play a pivotal role in elucidating reaction mechanisms by modeling molecular structures and energy landscapes. Techniques such as quantum mechanics and molecular dynamics simulations enable researchers to calculate reaction pathways, transition states, and intermediates with high precision. These methods complement experimental data by providing detailed insights into the electronic structure and thermodynamics of reactions. Furthermore, computational tools facilitate the prediction of reaction outcomes and the optimization of synthetic routes, making them indispensable in modern organic chemistry research. The integration of computational methods has significantly advanced the field, allowing for a deeper understanding of complex reaction mechanisms and guiding the development of new catalytic processes.

4.2 Experimental Techniques

Experimental techniques are essential for validating theoretical models and directly observing reaction mechanisms. Methods such as spectroscopy (IR, NMR, and UV-Vis) provide real-time insights into molecular transformations, helping to identify intermediates and transition states. Kinetic studies measure reaction rates, revealing the sequence of steps and the rate-determining step. Isotopic labeling and trapping experiments further elucidate the pathways by tracking specific atoms or capturing fleeting intermediates. Additionally, electrochemical methods and cyclic voltammetry are employed to study redox processes and reaction dynamics. These experimental approaches, often combined with computational analysis, offer a comprehensive understanding of reaction mechanisms, enabling the development of efficient and selective synthetic protocols in organic chemistry.

Applications of Reaction Mechanisms in Organic Synthesis

Understanding reaction mechanisms is crucial for advancing organic synthesis, enabling the design of efficient, selective, and scalable processes. By identifying intermediates and transition states, chemists can optimize reaction conditions, such as temperature, solvent, and catalysts, to improve yields and reduce waste. Mechanistic insights also guide the development of new catalytic systems, enhancing reaction rates and selectivity. Applications span drug discovery, where mechanisms inform the design of target molecules, and materials science, where tailored syntheses create advanced materials. Furthermore, mechanistic knowledge aids in troubleshooting synthesis challenges and predicting potential side reactions. This understanding accelerates the discovery of novel compounds and processes, driving innovation in organic chemistry and its industrial applications, ultimately contributing to scientific and technological progress.

monopoly deal rules pdf

Monopoly Deal is a fast-paced, strategic card game by Hasbro, released in 2008․ It offers a fresh, streamlined take on the classic Monopoly experience․

1․1 Overview of the Game

Monopoly Deal is a card-based variant of the classic board game, designed for 2-5 players․ The game focuses on collecting property sets, using action cards, and strategic trading․ Players aim to be the first to gather three complete property sets of different colors․ The deck includes property cards, money cards, and action cards like Deal Breaker and Sly Deal, adding excitement and strategy to the gameplay․

1․2 Release and Differentiation from Classic Monopoly

Monopoly Deal, released by Hasbro in 2008, differs from the classic board game by focusing on card-based gameplay․ Unlike the traditional version, which emphasizes buying properties and bankrupting opponents, Monopoly Deal centers on collecting three complete property sets․ The card mechanic introduces action cards like Deal Breaker and Sly Deal, adding strategic depth and faster gameplay compared to the original․

Objective of the Game

Monopoly Deal revolves around collecting three full property sets of different colors to win․ Unlike classic Monopoly, the focus is on acquiring complete property sets rather than accumulating money․

2․1 Primary Goal: Collecting Property Sets

The primary objective is to be the first player to collect three complete property sets of distinct colors․ Each set consists of all properties in a specific color group, similar to traditional Monopoly․ Players can achieve this by strategically using action cards, trading, and managing their resources effectively during the game․

2․2 Key Differences from Classic Monopoly

Monopoly Deal differs by focusing on card-based gameplay rather than a board․ The goal is to collect three property sets instead of bankrupting others․ Action cards introduce unique mechanics, enabling players to steal, swap, or disrupt opponents․ The game is faster-paced, with no house-building or lengthy trades, making it more accessible and quick to play compared to the classic version․

Setup and Preparation

Shuffle the deck, deal cards evenly to players, and place remaining cards face-down․ Remove Quick Start Rules for guidance, ensuring a smooth game start․

3․1 Deck Preparation

Begin by removing the 4 Quick Start Rules cards from the deck․ Shuffle the remaining cards thoroughly to ensure random distribution․ Deal the cards equally among all players, ensuring each receives the same number․ Place any leftover cards face-down in a draw pile․ This preparation ensures a fair and organized start to the game, with all players ready to begin․

3․2 Initial Card Distribution

To begin, each player is dealt 5 cards from the prepared deck․ Ensure cards are distributed evenly and face-down to maintain fairness․ The remaining cards are placed face-down in a central draw pile․ Players should not reveal their cards until instructed․ This initial distribution sets the stage for strategic gameplay and ensures all players start with equal opportunities to collect properties and action cards․

Gameplay Mechanics

Gameplay involves strategic card play, with players taking turns to draw, play up to three cards, and manage their collection․ Action cards add excitement and strategy․

4․1 Turn Structure

A player’s turn consists of drawing one card, then playing up to three cards from their hand․ These can include Property, Money, or Action cards․ Players can use Action cards to charge rent, steal properties, or disrupt opponents․ The turn ends after playing cards, with the next player proceeding clockwise․ Strategic card management is key to success․

4․2 Card Limits During Play

Players are limited to holding a maximum of seven cards in their hand during the game․ Any cards drawn or acquired through gameplay must be discarded if the total exceeds seven․ This rule applies to all card types, including Property, Money, and Action cards, ensuring a balanced and dynamic gameplay experience for all participants․

Types of Cards

Monopoly Deal features three primary card types: Property, Money, and Action․ Property Cards are used to collect sets, Money Cards for transactions, and Action Cards for strategic plays․

5․1 Property Cards

Property Cards are central to the game, representing real estate colors․ Players collect these to form complete sets, which are key to winning․ Each color group represents a unique set, and gathering three different sets is the primary objective․ These cards are earned through gameplay or acquired using Action Cards to expand your portfolio strategically․

5․2 Money Cards

Money Cards are used for transactions, enabling rent payments, buying properties, or completing sets․ They add strategic depth, allowing players to manage resources and block opponents․ These cards are essential for facilitating gameplay and achieving the objective of collecting three property sets, making them a vital component of the game’s economy and strategy․

5․3 Action Cards

Action Cards are a key element in Monopoly Deal, enabling players to influence the game dynamically․ Examples include Deal Breaker, Sly Deal, and Force Deal, allowing players to charge rent, steal properties, or disrupt opponents․ These cards add strategic depth, enabling players to outmaneuver others and gain an advantage in collecting property sets, making them a crucial part of the game’s excitement and strategy․

Action Cards

Action Cards are dynamic elements that allow players to influence the game․ There are 34 Action Cards in total, enabling players to charge rent, steal properties, or disrupt opponents, adding strategic depth to the gameplay experience․

6․1 Deal Breaker

The Deal Breaker is a powerful Action Card in Monopoly Deal․ It allows a player to steal a complete property set from another player’s collection․ This card can be played at any time, providing a strategic advantage by disrupting opponents’ progress․ There are only two Deal Breaker cards in the deck, making them highly sought after․

6․2 Sly Deal

The Sly Deal is another key Action Card, enabling players to take two properties from an opponent’s hand․ This card can be played during your turn, forcing the opponent to hand over the selected properties․ With three Sly Deal cards available, it adds an element of unpredictability, allowing players to strategically expand their collections at critical moments in the game․

6․3 Force Deal

The Force Deal is a powerful Action Card that allows you to take any single property from another player’s collection․ This card can be played during your turn, giving you direct control over an opponent’s asset․ With four Force Deal cards in the deck, it introduces a high level of interactivity, enabling players to disrupt opponents and strengthen their own property sets strategically․

Property Collection and Trading

Monopoly Deal revolves around collecting property sets and trading strategically․ Players aim to gather three full sets of different colors, using action cards to aid in acquiring properties․

7․1 Collecting Property Sets

In Monopoly Deal, players collect property cards to form complete sets of matching colors․ Each set consists of all properties in a specific color group․ Action cards like Sly Deal or Force Deal can help acquire needed properties from others․ The goal is to be the first to gather three unique sets, ensuring strategic card management and timely plays to win the game efficiently․

7․2 Trading Mechanisms

Trading in Monopoly Deal allows players to negotiate and exchange cards to complete property sets․ Action cards like Sly Deal or Force Deal can be used to take properties from others․ Players can also trade money or other cards to secure needed properties, enhancing strategic interactions and accelerating progress toward winning the game by forming three full property sets․

Winning the Game

The game ends when a player collects three full property sets of different colors, achieving the objective and securing victory through strategic card management and trading․

8․1 Winning Conditions

To win, a player must be the first to collect three complete property sets of different colors․ These sets must consist of all properties in a specific color group․

The game concludes immediately when a player achieves this goal, making them the winner through strategic card play and effective property management․

8․2 Effective Strategies

Focus on completing property sets quickly and strategically․ Use action cards like Deal Breaker or Sly Deal to disrupt opponents․ Prioritize collecting high-value sets and maintain sufficient cash reserves․ Monitor opponents’ progress to anticipate their moves and block their potential wins․ Negotiate trades wisely to strengthen your position while weakening others․ Adapt your strategy as the game unfolds to maximize your chances of winning․

Common Rules and Clarifications

Key rules include paying rent when landing on properties, using action cards strategically, and resolving debts promptly․ Players must adhere to card limits during play to maintain fair gameplay․

9․1 Rent Payment Rules

When a player lands on a property, they must pay rent to the property’s owner․ Rent amounts are determined by the property’s value and any improvements like houses or hotels․ If a player cannot pay the required rent, they must declare bankruptcy and exit the game, forfeiting all their assets to the creditor․

9․2 Debt Collection Process

In Monopoly Deal, debt collection occurs when a player uses Debt Collector cards, forcing another player to pay $5 million or hand over a property․ If the targeted player cannot pay, they are eliminated, and their assets are redistributed․ Debt Collector cards can be played during your turn, and the targeted player must comply immediately or face penalties․

Downloadable Resources

Official Monopoly Deal rules and strategy guides are available as PDF downloads․ These resources provide detailed gameplay instructions and tips for mastering the game effectively․

10․1 Official Rules PDF

The official Monopoly Deal rules PDF is a comprehensive guide detailing setup, gameplay, and winning conditions․ It includes instructions for collecting property sets, using action cards, and resolving disputes․ Available on Hasbro’s website, this document ensures clarity and consistency for players․ The PDF also outlines card types, trading mechanisms, and debt collection processes, making it essential for both new and experienced players․

10․2 Additional Strategy Guides

Additional strategy guides for Monopoly Deal provide tips for optimizing gameplay, such as effectively using action cards, managing money, and trading strategically․ These guides often include insights from experienced players and cover advanced tactics like aggressive and defensive playstyles․ Available online, they complement the official rules, helping players refine their skills and improve their chances of winning․

Strategies and Tips

Master key strategies like aggressive play, defensive tactics, and optimal money management․ Utilize action cards wisely to outmaneuver opponents and secure property sets efficiently for victory․

11․1 Aggressive Play

Aggressive play involves actively disrupting opponents using action cards like Deal Breaker or Sly Deal to steal properties or force deals․ Prioritize acquiring high-value properties early and strategically use money cards to maintain liquidity․ Constantly pressure opponents to prevent them from completing sets, while ensuring you have enough cash to capitalize on opportunities and secure victory․

11․2 Defensive Play

Defensive play focuses on minimizing losses and protecting your properties․ Use action cards like Just Say No or Debt Collector to counter opponents’ moves․ Maintain a strong cash reserve to pay rents and avoid debt․ Prioritize completing your property sets while disrupting opponents’ progress․ Strategic card management ensures you stay competitive without overextending your resources․

Monopoly Deal is a strategic card game where players collect property sets to win․ It combines luck, skill, and quick thinking, with action cards adding excitement․ Ideal for short sessions, it’s perfect for families and casual gamers․ Mastering the official rules enhances gameplay, making it a timeless favorite for all ages․

ge nautilus dishwasher manual

Welcome to the GE Nautilus Dishwasher Manual, your comprehensive guide to understanding and optimizing your appliance. This manual covers models GSC3200GWW, GSC3200GBB, and GSC3400GWW, providing essential information for installation, operation, and maintenance. Designed to enhance your dishwashing experience, it offers troubleshooting tips, energy-saving features, and safety precautions to ensure longevity and efficiency. Read on to maximize your dishwasher’s performance and enjoy sparkling clean dishes every time.

Overview of the GE Nautilus Dishwasher Series

The GE Nautilus Dishwasher Series offers reliable performance with models like GSC3200GWW, GSC3200GBB, and GSC3400GWW. Designed for efficiency and ease of use, these built-in dishwashers feature multiple wash cycles, quiet operation, and durable construction. They cater to various household needs, ensuring clean dishes with minimal effort. Each model is built to provide consistent results, making the GE Nautilus series a trusted choice for home kitchens.

Importance of Reading the Manual

Reading the GE Nautilus Dishwasher Manual is crucial for optimal performance and longevity. It provides essential guidance on installation, operation, and maintenance, ensuring safe and efficient use. The manual helps users understand features, troubleshoot issues, and maintain their appliance properly. By following the instructions, you can prevent common problems, extend the lifespan of your dishwasher, and enjoy consistent cleaning results for years to come.

Product Specifications

The GE Nautilus dishwasher series includes models GSC3200GWW, GSC3200GBB, and GSC3400GWW, each offering advanced wash cycles, energy efficiency, and quiet operation for optimal cleaning performance.

Model Variations (GSC3200GWW, GSC3200GBB, GSC3400GWW)

The GE Nautilus series offers three distinct models: GSC3200GWW, GSC3200GBB, and GSC3400GWW. The GSC3200GWW and GSC3200GBB are similar, featuring white and black finishes, respectively, with standard wash cycles. The GSC3400GWW includes advanced features like additional wash options and improved noise reduction. Each model is designed for efficient performance, catering to different kitchen aesthetics and functional needs.

Key Features of the GE Nautilus Dishwasher

The GE Nautilus dishwasher boasts multiple wash cycles, including heavy-duty and light options, ensuring optimal cleaning for various loads. Its energy-efficient design meets Energy Star standards, reducing water and energy consumption. The quiet operation feature minimizes noise, while the durable stainless steel tub enhances longevity. Additional features include a smart drying system for spot-free dishes and an advanced filtration system to trap food particles, ensuring cleaner results.

Installation Instructions

Welcome to the GE Nautilus Dishwasher installation guide. This section provides step-by-step instructions for disconnecting your old dishwasher, installing the new unit, connecting water and power lines, and leveling the appliance for optimal performance. Consider professional installation for a seamless setup;

Pre-Installation Requirements

Before installing your GE Nautilus dishwasher, ensure the installation area is clear and meets the specified dimensions. Shut off water and power supplies. Check for level flooring and proper ventilation. Verify the electrical and water connections are compatible. Measure the space to ensure the dishwasher fits perfectly. Gather all necessary tools and materials, and consult a professional if unsure about any step to avoid complications.

Step-by-Step Installation Guide

Begin by carefully unpacking the dishwasher and inspecting for damage. Secure the appliance to adjacent countertops to prevent movement. Connect the water supply line to the designated inlet, ensuring no leaks. Next, attach the electrical connections according to the manual. Level the dishwasher using adjustable feet for proper operation. Test the drainage system by running a short cycle. Finally, verify all connections are secure and the area is clear before first use.

Operating Instructions

Operate your GE Nautilus dishwasher by loading dishes properly, selecting the right cycle, and adding detergent. Ensure the appliance is level and connections are secure. Follow manual guidelines for optimal performance and troubleshooting tips.

Dish Preparation and Loading Tips

For optimal cleaning, scrape dishes of large food particles but avoid rinsing. Load utensils in designated holders, placing heavier items at the bottom rack. Arrange plates facing the center, ensuring proper water flow. Avoid blocking the spray arms. Delicate items like glassware should be placed on the top rack. Always check for nesting to prevent poor cleaning results. Load bowls and pots with openings downward to trap water effectively. Keep the dishwasher balanced for optimal performance. Follow these tips to ensure your dishes come out clean and undamaged.

Selecting the Right Wash Cycle

Selecting the right wash cycle ensures efficient cleaning and energy savings. For lightly soiled dishes, use the Normal cycle. Heavily soiled items require the Heavy Duty cycle. The Light cycle is ideal for delicate items. The Energy Saver cycle reduces energy consumption for lighter loads. Match the cycle to the soil level and load size for optimal results. Regular maintenance ensures consistent performance across all cycles.

Adding Dishwashing Detergent

For optimal performance, add detergent to the designated compartment. The GE Nautilus dishwasher uses a detergent dispenser located on the door. Fill the compartment with the recommended amount of dishwasher detergent, ensuring it aligns with the cycle selected. Use only dishwasher-specific detergents to avoid poor cleaning results or residue buildup. Proper detergent dosage ensures clean dishes and prevents overuse, maintaining efficiency and longevity. Always follow the manufacturer’s guidelines for best results.

Maintenance and Care

Regular maintenance ensures optimal performance and longevity. Clean the filter, check for blockages, and run cleaning cycles. Proper care prevents odors and maintains efficiency over time.

Regular Maintenance Tips

Regularly clean the dishwasher filter to ensure optimal performance. Check for blockages in spray arms and detergent dispensers. Run a cleaning cycle with dishwasher cleaner to remove grease and odors. Wipe down the exterior with a damp cloth and dry thoroughly. For tough stains, use a gentle appliance polish. Maintain freshness by leaving the door slightly open after cycles to prevent moisture buildup.

Cleaning the Dishwasher Filter

Cleaning the dishwasher filter regularly ensures optimal performance. Locate the filter at the bottom of the dishwasher. Twist and remove it, then rinse thoroughly with warm, soapy water. Check for food particles and debris, scrubbing gently if necessary. Replace the filter securely to maintain proper water flow and cleaning efficiency. Regular cleaning prevents clogs and improves wash results.

Exterior Care and Cleaning

Regularly clean the dishwasher’s exterior to maintain its appearance and hygiene. Use a lightly dampened cloth to wipe the control panel and exterior surfaces. For tougher stains, apply a mild detergent. Avoid abrasive cleaners or bleach, as they may damage the finish. Polish the exterior with a good appliance wax for a sleek look. Regular cleaning prevents grime buildup and keeps your dishwasher looking new.

Troubleshooting Common Issues

Identify and resolve common issues like error codes, unusual noises, or odors. Refer to the manual for specific solutions. Contact GE support for further assistance and troubleshooting.

Identifying and Resolving Error Codes

Refer to the manual for specific error codes and their meanings. Common codes indicate issues like water supply problems or faulty sensors. Reset the dishwasher by turning it off and on. If issues persist, contact GE customer support or a professional. Regular maintenance, like cleaning filters, can prevent errors. Ensure correct detergent usage to avoid staining or malfunctioning. Always follow the manual’s troubleshooting guide for model-specific solutions.

Addressing Odd Noises or Smells

Odd noises may indicate worn parts or improper loading. Check for loose items and ensure the dishwasher is level. Unpleasant smells often result from food residue. Regularly clean the filter and run a cleaning cycle. Use a dishwasher cleaner or vinegar rinse to eliminate odors. Refer to the manual for model-specific solutions and maintenance tips to prevent future issues.

Customer Support and Resources

Welcome to the GE Nautilus Dishwasher support section. Access manuals, FAQs, and troubleshooting guides online. Contact GE customer service for assistance or visit authorized service centers for parts and repairs.

Accessing the GE Nautilus Dishwasher Manual Online

To access the GE Nautilus Dishwasher Manual online, visit the official GE Appliances website or authorized portals like ManualsLib. Models such as GSC3200GWW, GSC3200GBB, and GSC3400GWW are readily available for free download. Additionally, Repair Clinic offers manuals, care guides, and literature with same-day shipping options, ensuring easy access to all necessary documentation for optimal performance and troubleshooting.

GE Customer Service Contact Information

For assistance with your GE Nautilus Dishwasher, visit the official GE Appliances website or contact their customer service team. You can reach them via phone at 1-800-626-2002 or through their online support portal. Additionally, Repair Clinic offers customer support for parts and manual-related inquiries, ensuring prompt assistance for any dishwasher needs.

Environmental and Energy Efficiency

The GE Nautilus Dishwasher is designed with energy-saving features to reduce water and energy consumption, promoting eco-friendly dishwashing practices and lowering utility bills while protecting the environment.

Energy-Saving Features of the GE Nautilus

The GE Nautilus Dishwasher incorporates advanced energy-saving technologies, including an Energy Star certification, low water consumption cycles, and an eco-mode that reduces energy usage. These features not only lower utility bills but also contribute to environmental sustainability. By utilizing sensors to optimize water and heat, the dishwasher ensures efficient cleaning while minimizing energy waste, making it an eco-friendly choice for modern households.

Eco-Friendly Dishwashing Practices

Adopt eco-friendly habits with your GE Nautilus Dishwasher by using the correct detergent amount, scraping dishes instead of rinsing, and loading efficiently. Selecting the eco-mode reduces energy consumption. Regular maintenance, like cleaning filters, ensures optimal performance. These practices minimize water and energy use, promoting sustainability while maintaining cleaning effectiveness for a greener household routine.

Additional Accessories and Parts

Enhance your GE Nautilus Dishwasher’s performance with recommended accessories like detergent dispensers and rinse aid. Authentic GE replacement parts ensure compatibility and reliability. Visit GE’s official resources or authorized retailers for genuine components tailored to your model.

Recommended Accessories for Optimal Performance

To enhance your GE Nautilus Dishwasher’s efficiency, consider adding a detergent dispenser for precise dosing, a rinse aid for spot-free drying, and a water softening system to prevent mineral buildup. Additionally, a dishwasher cleaner can maintain your appliance’s interior health. Using genuine GE accessories ensures compatibility and optimal performance, prolonging your dishwasher’s lifespan and ensuring sparkling results with every cycle.

Where to Find Replacement Parts

Replacement parts for your GE Nautilus Dishwasher can be found through authorized retailers like Repair Clinic or GE’s official website. Ensure to use genuine parts for compatibility and optimal performance. Search using your dishwasher’s model number (e.g., GSC3200GWW) to find exact matches. Visit GE Appliances or trusted suppliers to maintain your dishwasher’s efficiency and longevity with authentic components.

Safety Information

Ensure safe operation by following guidelines in the GE Nautilus Dishwasher Manual. Avoid sharp objects, keep children away, and use only approved dishwashing detergents to prevent accidents.

Important Safety Precautions

Always follow the guidelines in the GE Nautilus Dishwasher Manual to ensure safe operation. Avoid placing sharp objects in the dishwasher, as they may cause damage or injury. Keep children away from the appliance during operation, and never allow them to play with the controls. Use only dishwasher-approved detergents to prevent harmful chemical reactions. Regularly clean the filter to maintain performance and safety. Never overload the dishwasher, as this can lead to imbalance during cycles. Ensure the dishwasher is properly installed and grounded to avoid electrical hazards. Refer to the manual for specific warnings and precautions to ensure safe and efficient use of your GE Nautilus Dishwasher.

Child Safety Features

The GE Nautilus Dishwasher includes child safety features to prevent accidental operation. A child safety lock ensures the controls cannot be activated by children. Additionally, the dishwasher is designed with a secure latching system to prevent unauthorized access. These features help protect children from potential hazards. Always activate the child lock and teach children to stay away from the appliance during operation. Refer to the manual for specific instructions on enabling these safety features.

Caring for Your Dishes and Utensils

Prevent water spots by using a rinse aid and drying utensils after cycles. Delicate items like glassware and fine china require gentle wash settings. Regular cleaning of filters ensures optimal performance and protects dishes from food residue.

Preventing Water Spots and Staining

To prevent water spots, use a rinse aid and ensure the dishwasher’s heating element is functioning properly. Regularly clean the filter to avoid food residue redepositing onto dishes. Avoid using abrasive detergents, as they can etch glassware. For stainless steel utensils, dry them immediately after the cycle to prevent staining. This will help maintain the appearance and longevity of your dishes and utensils.

Protecting Delicate Items

Use the gentle cycle for delicate items like glassware, fine china, and non-stick utensils; Ensure items are securely placed to avoid movement during cycles. Avoid using abrasive detergents, as they can damage surfaces. For fragile items, consider handwashing or placing them in a protective rack. Always rinse aid can help reduce water spots. Dry delicate items promptly after the cycle to prevent staining and maintain their appearance.

Maximizing the Lifespan of Your GE Nautilus Dishwasher

Regular maintenance and proper care are key to extending your dishwasher’s lifespan. Clean the filter periodically to ensure optimal performance. Use the recommended detergent and avoid overcrowding. Check water temperature settings and run cleaning cycles as needed. Exterior care includes wiping with a damp cloth and avoiding harsh chemicals. Follow these tips to maintain efficiency and durability, ensuring your GE Nautilus dishwasher serves you well for years.

mopar electronic ignition conversion instructions

Mopar electronic ignition conversion enhances vehicle performance and reliability by upgrading traditional points-based systems to modern electronic ignition. This transition simplifies wiring and improves overall engine efficiency.

Why Convert to Electronic Ignition?

Converting to electronic ignition modernizes your Mopar’s outdated points-based system, eliminating mechanical wear and tear. Electronic systems offer consistent spark delivery, reduced maintenance, and improved reliability. They also simplify wiring by removing the external ignition box, reducing potential failure points. This upgrade enhances overall engine performance, making it a practical choice for both classic and modern Mopar vehicles seeking better efficiency and durability.

Overview of Mopar Ignition Systems

Mopar ignition systems traditionally rely on a points-based distributor, which, while effective, can be less reliable and require more maintenance. Modern electronic ignition systems are increasingly popular for their improved performance and reliability. These systems eliminate the mechanical points, reducing wear and tear and enhancing spark consistency. Understanding the basics of Mopar ignition systems is crucial for a smooth transition to electronic ignition, ensuring optimal engine operation and longevity.

Benefits of Electronic Ignition Conversion

Electronic ignition conversion offers improved reliability, enhanced performance, and simplified wiring. It eliminates mechanical wear, reduces maintenance, and provides consistent spark for better engine operation and efficiency.

Improved Reliability

Electronic ignition conversion enhances reliability by eliminating mechanical components prone to wear and tear. Points-based systems can fail over time, but electronic ignition ensures consistent spark delivery. This reduces maintenance needs and minimizes the risk of ignition-related breakdowns, providing a more dependable engine operation overall.

Enhanced Performance

Electronic ignition conversion boosts engine performance by ensuring a consistent and precise spark, which optimizes combustion. This results in smoother acceleration, better throttle response, and increased horsepower. The elimination of misfires and consistent energy delivery across all cylinders further enhances overall performance, making it ideal for both daily driving and high-performance applications while reducing emissions.

Simplified Wiring

Electronic ignition conversion significantly simplifies wiring by eliminating the need for an external ignition box and ballast resistor. This reduction in components minimizes potential failure points and streamlines the system. Pre-labeled wires in conversion kits ensure a straightforward installation process, reducing the risk of wiring errors and making the system more reliable and easier to maintain over time.

Understanding the Components Involved

The electronic ignition system includes key components like the ignition module, coil, distributor cap, and rotor. These parts work together to generate and distribute the spark needed for engine operation.

Ignition Module

The ignition module is the brain of the electronic ignition system, responsible for generating the high voltage needed for spark production. It replaces traditional points and condenser setups, offering improved reliability and reduced maintenance. Modern modules provide consistent spark output, adapt to engine conditions, and integrate seamlessly with the coil and distributor. Proper installation ensures optimal performance and longevity of the ignition system.

Coil

The coil is a critical component in the electronic ignition system, serving as a transformer to step up voltage for spark production; Modern coils, such as those used in HEI systems, offer improved efficiency and reliability compared to older models. Proper installation and connection ensure consistent spark output, reducing energy loss and enhancing overall ignition system performance. Regular inspection is recommended to maintain optimal functionality.

Distributor Cap and Rotor

The distributor cap and rotor are essential for directing the spark to the correct cylinder. Upgrading these components ensures proper spark distribution and prevents misfires. Modern designs offer improved durability and resistance to wear. Proper alignment during installation is crucial for maintaining consistent engine performance and avoiding ignition-related issues. Regular inspection and cleaning can extend their lifespan and ensure reliable operation;

Gathering Tools and Materials

Collect essential tools like wrenches, screwdrivers, and a multimeter. Gather materials such as ignition modules, coils, wiring harness, and conversion kits. Ensure all components are compatible with your Mopar system for a smooth installation process. Consult the conversion kit list to verify all necessary parts are included before starting the project.

Essential Tools for the Conversion

Gather a set of basic tools, including wrenches, screwdrivers, pliers, and a multimeter. Wire strippers and crimpers are necessary for wiring connections. A torque wrench ensures proper bolt tightening. Pliers and punches may be needed for older systems. Additionally, a spark tester can help diagnose ignition issues, and a digital multimeter is useful for verifying electrical connections. Having these tools ready simplifies the conversion process and ensures accuracy.

Required Parts and Accessories

Key components include a Mopar electronic distributor, ignition module, and compatible coil. A high-quality wiring harness is essential for proper connections. Spark plug wires, spark plugs, and a capacitor may also be needed. Ensure all parts are compatible with your vehicle’s make and model. These components ensure a smooth and reliable conversion, preventing potential electrical issues during the process.

Choosing the Right Conversion Kit

Selecting the correct Mopar electronic ignition conversion kit ensures compatibility and reliability. Look for kits designed for your vehicle’s specific make and model, including necessary components for a seamless install.

Key Features to Look For

When selecting a Mopar electronic ignition conversion kit, prioritize compatibility with your vehicle’s specific make and model. Ensure the kit includes essential components like an ignition module, coil, and wiring harness. Look for durable, high-quality materials and straightforward installation instructions. Optional features such as adjustable timing and built-in diagnostic capabilities can enhance performance and troubleshooting. Verify that the kit is designed for your engine type to guarantee a seamless installation and optimal functionality.

Popular Mopar Conversion Kits

Popular Mopar electronic ignition conversion kits include the MSD HEI-style ignition conversion and the Holley Sniper HEI kit. These kits are known for their compatibility with Mopar engines and offer improved performance. The MSD kit features a high-quality ignition module and coil, while the Holley Sniper is renowned for its all-in-one design and adjustable timing capabilities. Both kits are durable and designed for easy installation, making them top choices for enthusiasts. Always research the specifications to ensure compatibility with your Mopar engine.

Preparing the Vehicle for Conversion

Begin by disconnecting the battery to ensure safety and prevent accidental engine start. Next, remove the old ignition system, including the distributor cap and rotor, to prepare for the electronic upgrade. Labeling wires and cleaning the area around the ignition system is also crucial for a smooth conversion process.

Disconnecting the Battery

Always start by disconnecting the negative battery terminal to ensure safety and prevent accidental engine start. Locate the negative terminal, typically marked with a “-” sign, and loosen it with a wrench. Completely remove the terminal from the battery post to disconnect it. This step prevents any electrical current from flowing during the conversion process. Use a multimeter to verify no voltage is present before proceeding. Secure the disconnected cable to prevent it from accidentally reconnecting while working on the vehicle.

Removing the Old Ignition System

Start by disconnecting the battery to ensure safety. Next, disable the ignition system by removing the distributor cap and rotor. Gently pull the distributor wires from the spark plugs, taking care not to damage them. Remove the ignition coil by disconnecting its wiring harness and bolts. Finally, extract the old ignition module and any associated components. Store removed parts securely for potential future use or disposal.

Installing the Electronic Ignition Module

Mount the electronic ignition module securely in the designated location. Connect the wiring harness as per manufacturer’s specifications. Ensure all connections are secure and proper function is achieved by following installation guidelines carefully.

Mounting the Module

Locate the module’s designated mounting area, typically near the distributor. Clean the surface thoroughly before installation. Use the provided adhesive or screws to secure the module firmly. Ensure the module is tightly fastened to prevent vibration damage. Follow manufacturer guidelines for proper orientation and alignment. Double-check the module’s position to avoid interference with other engine components.

Connecting Wires

  • Identify the ignition module’s wiring harness and connect it to the distributor cap.
  • Attach the positive coil wire to the ignition coil, ensuring a secure connection.
  • Connect the negative coil wire to the module’s designated terminal.
  • Link the tachometer wire to the appropriate terminal for accurate RPM readings.
  • Ensure all connections are tight and properly insulated to prevent interference.

Testing and Fine-Tuning

Start the engine to ensure proper operation. Check for misfires or unusual noises. Adjust ignition timing and module settings as needed for optimal performance and reliability.

Initial Start-Up

After installing the electronic ignition module, reconnect the battery and start the engine. Listen for smooth operation and ensure there are no misfires or unusual noises. Check the tachometer to confirm stable RPMs at idle. Verify that the ignition module is functioning correctly by monitoring dash lights or diagnostic tools for any error codes. A successful start indicates the system is operational and ready for further tuning.

Adjusting Settings

After the initial start-up, fine-tune the electronic ignition module to optimize performance. Adjust the timing and dwell angle using a timing light or scan tool for precision. Ensure proper spark output by verifying coil resistance and capacitor settings. Fine-tune the ignition curve for improved performance under various driving conditions. Refer to the conversion kit’s manual for specific adjustment guidelines tailored to your Mopar system.

Troubleshooting Common Issues

Identify ignition-related problems by checking for spark, verifying wiring connections, and ensuring the module functions correctly. Address common issues like misfires or faulty sensors promptly to maintain performance.

Diagnosing Ignition Problems

Diagnosing ignition issues involves checking for spark at the spark plugs, ensuring proper wiring connections, and verifying the ignition module’s functionality. Use a multimeter to test voltage at the coil and module. Check for error codes using a scan tool if equipped. Inspect the distributor cap and rotor for wear or cracks. Addressing these areas helps pinpoint common problems like misfires or faulty sensors, ensuring reliable engine operation and performance.

Fixing Wiring and Connection Errors

Begin by inspecting all wiring for damage or corrosion. Use a multimeter to test for proper voltage and continuity. Ensure all connections are secure and free from debris. Replace any faulty wires or connectors. Verify compatibility between components, such as the ignition module and coil. Consult a wiring diagram for accuracy. Properly route and secure wires to prevent interference and ensure reliable operation. This step is crucial for avoiding ignition failures and maintaining performance.

Mopar electronic ignition conversion is a straightforward upgrade that enhances reliability, performance, and simplicity. Proper planning and execution ensure a smooth transition to modern ignition systems, improving overall vehicle efficiency and longevity.

Final Tips for a Successful Conversion

Plan meticulously, use high-quality components, and follow instructions closely. Double-check wiring connections and ensure proper grounding. Test the system thoroughly after installation. Consult forums or manuals for troubleshooting common issues. Regular maintenance, like inspecting spark plugs and wires, will ensure long-term reliability and optimal performance. Attention to detail guarantees a smooth and successful electronic ignition conversion for your Mopar vehicle.

Long-Term Maintenance

Regularly inspect spark plugs, wires, and the distributor cap for wear or damage. Clean or replace components as needed to maintain optimal performance. Check the ignition module and wiring connections annually for corrosion or loose links. Schedule periodic tune-ups to ensure the electronic ignition system operates efficiently. Proper upkeep extends the lifespan of your Mopar’s ignition system and prevents unexpected issues down the road.

citizen blue angel watch manual pdf

The Citizen Blue Angel Watch combines precision, style, and durability, featuring Eco-Drive technology and advanced timekeeping. The manual provides essential guidance for setup, maintenance, and troubleshooting.

1.1 Overview of the Citizen Blue Angel Watch Series

The Citizen Blue Angel Watch Series is a collection of high-performance timepieces designed for precision and durability. These watches feature Eco-Drive technology, atomic timekeeping, and a pilot’s rotating slide ring. Built for aviation enthusiasts, they combine functionality with sleek designs. The series is part of Citizen’s collaboration with the Blue Angels squadron, reflecting their commitment to excellence. The manual provides detailed guidance for optimal use and maintenance.

1.2 Key Features and Benefits of the Blue Angel Watch

The Blue Angel Watch offers atomic timekeeping for superior accuracy, Eco-Drive technology for solar charging, and a pilot’s rotating slide ring for easy navigation. Its stainless steel band ensures durability, while the aesthetic design appeals to both aviation enthusiasts and watch connoisseurs. The manual highlights these features, ensuring users maximize functionality and maintain their timepiece effectively. These benefits make it a reliable companion for precise timekeeping and style.

Understanding the Citizen Blue Angel Watch Manual

The manual provides clear instructions for setup, troubleshooting, and maintenance, ensuring users can optimize performance and longevity of their Citizen Blue Angel Watch effectively.

2.1 Importance of Reading the Manual

Reading the manual ensures understanding of the watch’s advanced features and proper operation. It provides safety guidelines, troubleshooting tips, and maintenance advice, optimizing performance and preventing damage. The manual also clarifies how to set time zones, alarms, and use Eco-Drive technology effectively. Users who skip this step may miss critical functions or cause accidental issues. Taking time to read the manual guarantees smooth operation and extends the watch’s lifespan.

2.2 How to Download the Citizen Blue Angel Watch Manual PDF

To download the Citizen Blue Angel Watch manual, visit Citizen’s official website. Select your watch model from the provided list. Click the “Download” button and complete the verification process by entering the image code. Once verified, the PDF manual will be available for download. This guide covers setup, maintenance, and troubleshooting, ensuring optimal use of your timepiece. Accessing the manual is straightforward and essential for understanding all features.

Setting Up Your Citizen Blue Angel Watch

Set the time, date, and time zones by following the manual’s instructions. Ensure the Eco-Drive battery is fully charged for optimal performance. Refer to the guide for detailed setup steps.

3.1 Basic Setup Instructions

Start by powering on the watch and ensuring the Eco-Drive battery is fully charged. Set the time and date using the crown or buttons, following the manual’s guidance. Adjust time zones if necessary and sync with atomic time for accuracy. Refer to the PDF manual for detailed step-by-step instructions to ensure proper setup and functionality.

3.2 Configuring Time, Date, and Time Zones

Set the time and date using the crown or buttons, following the manual’s guidance. Enable atomic timekeeping for automatic synchronization. For manual adjustments, select the correct time zone from the list. The watch supports multiple time zones, ensuring accuracy worldwide. Refer to the PDF manual for detailed instructions on configuring these settings to maintain precise timekeeping and optimal performance.

Maintenance and Care for the Citizen Blue Angel Watch

Regularly clean the watch with a soft cloth to prevent dirt buildup. Ensure the Eco-Drive battery is fully charged for optimal performance. Avoid extreme temperatures.

4.1 Cleaning and Servicing Guidelines

Regularly clean the Citizen Blue Angel Watch with a soft, dry cloth to remove dirt and fingerprints. For stubborn stains, dampen the cloth with water, but avoid harsh chemicals; The stainless steel band can be cleaned with a mild soap solution. Ensure the watch is dry before storing; Servicing should be done by authorized professionals to maintain accuracy and water resistance. Follow manual instructions for optimal care.

4.2 Battery and Eco-Drive Charging Instructions

The Citizen Blue Angel Watch features Eco-Drive technology, powered by light. Expose the watch to direct sunlight or bright artificial light for charging. Avoid prolonged darkness to maintain battery life. To check the charge level, pull the crown to the “B” position and observe the second hand. Store the watch in bright light when not in use to ensure optimal performance and longevity.

Troubleshooting Common Issues

Identify and resolve timekeeping errors by checking time zones and synchronizing with atomic time. Ensure proper charging and consult the manual for detailed solutions to common issues.

5.1 Resolving Timekeeping Errors

Address timekeeping issues by resetting the watch or synchronizing it with atomic time. Ensure correct time zone settings and proper exposure to light for Eco-Drive charging. Consult the manual for detailed troubleshooting guides to restore accuracy and optimal performance. Regularly check and adjust settings to prevent errors and maintain precise timekeeping functionality. Refer to the manual for specific instructions tailored to your Citizen Blue Angel Watch model.

5.2 Addressing Charging and Power Issues

If your Citizen Blue Angel Watch experiences charging or power issues, ensure it receives adequate light exposure to recharge the Eco-Drive battery. Check the power reserve level and avoid prolonged darkness. If issues persist, consult the manual for reset procedures or seek professional servicing. Proper charging and maintenance will ensure optimal performance and longevity of your timepiece.

Advanced Features of the Citizen Blue Angel Watch

The Citizen Blue Angel Watch boasts advanced features like atomic timekeeping, ensuring precise synchronization, and a pilot’s rotating slide ring for easy navigation and calculations.

6.1 Atomic Timekeeping Technology

Atomic timekeeping technology ensures the Citizen Blue Angel Watch synchronizes with atomic clocks worldwide, providing unparalleled accuracy. This feature automatically adjusts for time zones and daylight saving changes, maintaining precise timekeeping regardless of location or conditions. The manual details how to enable and troubleshoot this function, ensuring optimal performance and reliability for users globally.

6.2 Using the Pilot’s Rotating Slide Ring

The Pilot’s Rotating Slide Ring on the Citizen Blue Angel Watch enhances functionality for aviation enthusiasts. It allows easy tracking of flight times, fuel calculations, and navigation. The manual provides step-by-step guidance on operating the ring, ensuring precise control over its features. This tool is invaluable for pilots and travel enthusiasts, offering practicality and style in a durable design.

Design and Build Quality

The Citizen Blue Angel Watch features a robust stainless steel band and durable construction, ensuring long-lasting performance. Its elegant design combines style with functionality, appealing to both professionals and casual wearers.

7.1 Stainless Steel Band and Durability

The Citizen Blue Angel Watch boasts a high-quality stainless steel band, known for its durability and resistance to corrosion. This robust design ensures the watch can withstand rigorous wear and tear, making it ideal for both everyday use and extreme conditions. The stainless steel band provides a comfortable fit while maintaining a sleek, professional appearance.

7.2 Aesthetic Appeal and Style Options

The Citizen Blue Angel Watch offers a sleek, modern design with a luminous finish and bold accents, making it a stylish accessory for any occasion. Its aviation-inspired aesthetics, combined with a stainless steel band, provide a professional and sophisticated look. Available in various color schemes and strap options, the watch allows for personalized style, ensuring it complements both casual and formal attire effortlessly.

Eco-Drive Technology Explained

Citizen’s Eco-Drive technology harnesses light to power the watch, eliminating the need for battery replacements. It converts light into electrical energy, ensuring continuous operation and sustainability.

8.1 How Eco-Drive Technology Works

Citizen’s Eco-Drive technology converts light into electrical energy to power the watch. A solar cell under the dial captures light, storing excess energy in a rechargeable battery. This eliminates the need for battery replacements and ensures continuous operation. The watch charges in both natural and artificial light, providing a sustainable power source. Proper charging is essential for optimal performance, as outlined in the manual.

8.2 Benefits of Solar-Powered Watches

Solar-powered watches, like the Citizen Blue Angel, offer unmatched convenience and sustainability. They eliminate the need for battery replacements, reducing maintenance and environmental impact. Eco-Drive technology ensures reliable performance, as it harnesses light to recharge continuously. This eco-friendly design appeals to conscious consumers while providing long-term durability and energy efficiency, making it a practical choice for everyday wear and travel.

Additional Functions and Customization

The Citizen Blue Angel Watch offers alarms, timers, and a stopwatch for enhanced functionality. Users can customize settings to suit their preferences, ensuring a personalized experience.

9.1 Alarms, Timers, and Stopwatch Features

The Citizen Blue Angel Watch includes multiple alarms for reminders, a countdown timer for events, and a precise stopwatch. These features are easily accessible via the manual, ensuring users can set and manage them efficiently. The stopwatch offers split-time functionality, perfect for tracking lap times or intervals, while alarms provide audible reminders for important schedules or tasks.

9.2 Customizing Watch Settings for Personal Preferences

Users can personalize their Citizen Blue Angel Watch by adjusting time zones, alarms, and display settings. The manual guides customization, allowing individuals to tailor features like date format, time display, and alarm tones. Additional settings, such as the pilot’s rotating slide ring, can be configured for specific needs, ensuring the watch aligns with personal preferences and enhances user experience through precise and intuitive adjustments.

The Blue Angels Legacy and Partnership with Citizen

Citizen’s collaboration with the Blue Angels, the Navy’s elite squadron, reflects precision and performance. Their partnership inspires timepieces with advanced features, embodying trust and aviation heritage.

10.1 History of the Blue Angels Squadron

Founded in 1946, the Blue Angels are the Navy’s elite flight demonstration squadron, renowned for their precision and grace. Their performances inspire awe, showcasing naval aviation excellence globally. Citizen’s partnership with the Blue Angels began over 25 years ago, creating watches that reflect the squadron’s values of precision, durability, and style, aligning with their legacy of excellence and technological advancement.

10.2 Citizen’s Collaboration with the Blue Angels

Citizen’s partnership with the Blue Angels, spanning over 25 years, has led to the creation of timepieces embodying precision and innovation. These watches feature atomic timekeeping, a pilot’s rotating slide ring, and Eco-Drive technology. Designed to honor the squadron’s legacy, they combine functionality with style, appealing to aviation enthusiasts and watch collectors alike, reflecting the Blue Angels’ commitment to excellence and performance.

Frequently Asked Questions

How do I set up my Citizen Blue Angel watch? Refer to the manual for basic setup and troubleshooting steps. Ensure Eco-Drive charging is complete.

11.1 Common Queries About the Blue Angel Watch

Users often inquire about setting time zones, charging Eco-Drive models, and troubleshooting timekeeping errors. The manual provides detailed guidance for these and other common issues to ensure optimal performance. Additionally, questions about durability, water resistance, and maintenance are frequently addressed in the manual, offering comprehensive support for owners.

11.2 Tips for Optimal Performance and Longevity

For optimal performance, ensure the Eco-Drive is fully charged with sufficient light exposure. Avoid extreme temperatures and magnetic fields. Regularly clean the watch and bracelet to prevent damage. Use atomic time synchronization for accuracy and refer to the manual for proper care. Store the watch in a cool, dry place when not in use to maintain longevity and functionality.

The Citizen Blue Angel Watch offers precision, durability, and style, supported by a comprehensive manual. Explore its features and maintain it well for lasting performance and satisfaction.

12.1 Final Thoughts on the Citizen Blue Angel Watch

The Citizen Blue Angel Watch is a stellar timepiece that blends functionality and style seamlessly. Its Eco-Drive technology ensures reliability, while its durable design and precise timekeeping make it a standout choice. The partnership with the Blue Angels adds a layer of legacy, appealing to aviation enthusiasts. With a comprehensive manual guiding users, this watch is both user-friendly and high-performance, making it a worthwhile investment for anyone seeking a versatile and stylish accessory.

12.2 Encouragement to Explore More Features

Take the time to explore the Citizen Blue Angel Watch’s advanced features, such as atomic timekeeping and the pilot’s rotating slide ring. Refer to the manual to discover how to customize settings for personal preferences. By diving deeper into its capabilities, you’ll unlock a more tailored and efficient experience, ensuring your watch becomes an indispensable companion for both style and functionality.

unimac dryer manual pdf

Welcome to the Unimac Dryer Manual PDF, your comprehensive guide to understanding and operating your UniMac dryer․ This manual provides essential information for proper installation, operation, and maintenance to ensure safety and efficiency․ Designed for both residential and commercial use, it covers key features, troubleshooting, and best practices to maximize performance and longevity․ Read carefully to optimize your drying experience and adhere to safety standards․

1․1 Overview of the Manual

This manual provides a detailed guide for UniMac dryer installation, operation, and maintenance․ It includes safety precautions, technical specifications, and troubleshooting tips․ Designed for both residential and commercial users, the manual ensures optimal performance and compliance with safety standards․ Refer to it for clear instructions and best practices․

1․2 Importance of Reading the Manual

Reading the manual is essential for safe and efficient operation of your UniMac dryer․ It provides critical safety precautions, installation guidelines, and maintenance tips․ Understanding the manual ensures proper use, helps identify features, and enables troubleshooting․ Adhering to its instructions prevents accidents and optimizes performance․

Safety Precautions and Instructions

Always follow safety guidelines to ensure safe operation․ Read all instructions before use, install properly, and ensure correct grounding․ Avoid unsafe practices to prevent hazards and maintain efficiency․

2․1 General Safety Guidelines

Always read instructions before use and ensure proper installation․ Avoid flexible plastic venting and follow grounding instructions to prevent hazards․ Regularly inspect vents and maintain a safe environment to ensure efficient and secure operation of your UniMac dryer;

2․2 Grounding Instructions

Ensure the dryer is properly grounded to prevent electrical hazards․ Refer to the installation manual for correct grounding procedures․ A proper earth connection is crucial for safe operation and to protect against electrical shock, adhering to safety standards and manufacturer recommendations․

2․3 Decal and Warning Labels

Decals and warning labels on the dryer provide critical safety information․ Always read and follow these instructions carefully․ They highlight potential hazards, proper usage, and essential precautions to ensure safe operation and compliance with safety standards․

Installation Requirements

Proper installation ensures safe and efficient dryer operation․ Follow local codes and manufacturer guidelines for venting, electrical connections, and placement․ Detailed instructions are provided to meet specific model requirements and safety standards․

3․1 Proper Location for Installation

Install your UniMac dryer in a well-ventilated, secure location, away from flammable materials․ Ensure the area is level and stable to prevent vibration․ Keep the dryer away from direct sunlight and moisture sources for optimal performance and safety․ Adhere to local building codes and manufacturer guidelines for placement․

3․2 Venting Requirements

Use rigid metal venting for your UniMac dryer, avoiding flexible plastic materials․ Ensure proper routing to the outdoors, securing all connections with clamps․ Regularly inspect and clean vents to prevent blockages and maintain efficiency․ Follow local codes and manufacturer guidelines for safe installation․ This ensures safe operation and optimal drying performance by preventing lint buildup and maintaining proper airflow․

3․3 Electrical Connection Instructions

Ensure the dryer is properly grounded by following the grounding instructions in the installation manual․ Connect the dryer to a dedicated 240-volt electrical circuit to prevent overloading․ Use the correct gauge wire as specified to avoid overheating․ Always consult a licensed electrician if unsure, and never share the circuit with other appliances for safe operation․

Model-Specific Information

UniMac dryers vary by model, with unique features and capacities․ Check the 18-digit model number to identify specific configurations and capabilities․ Refer to the model identification guide for detailed specifications and tailored instructions to ensure optimal performance and compatibility with your needs․

4․1 Understanding Model Numbers

UniMac dryer model numbers are 18 digits long, encoding key details about the unit․ The 13th digit indicates capacity, while the 15th digit shows voltage requirements․ Understanding these codes helps in identifying specific features, ensuring compatibility with installation and operation needs․ Refer to the guide for decoding assistance․

4․2 Model Identification Guide

UniMac dryers use specific prefixes and suffixes in their model numbers to identify capacity, voltage, and features․ For example, UT075N denotes a 75-pound tumble dryer, while UW65PV indicates a washer-extractor․ Refer to Page 9 for detailed decoding instructions to match your unit with the correct manual and specifications․

4․3 Key Features of Different Models

UniMac dryers offer varying capacities (50-120 pounds) and advanced features like micro-programming for tailored drying cycles․ High-efficiency models reduce energy consumption, while durable construction ensures long-term reliability․ Each model is designed for specific needs, from compact units to heavy-duty commercial machines, ensuring optimal performance in any setting․

Operating and Maintenance Instructions

This section provides guidelines for daily operation, routine maintenance, and proper usage of your UniMac dryer․ Follow instructions for safety, efficiency, and longevity․ Regular cleaning and checks are essential․

5․1 Daily Operation Guidelines

  • Always read instructions before starting the dryer․
  • Ensure proper installation as per manufacturer guidelines․
  • Monitor load size to avoid overloading․
  • Check filters and clean them regularly for efficiency․
  • Ensure proper ventilation to prevent heat buildup․
  • Adhere to safety precautions to avoid accidents․

5․2 Routine Maintenance Tasks

Regular maintenance ensures optimal performance and longevity․ Clean lint filters after each use to improve airflow and efficiency․ Inspect and clean venting systems to prevent blockages․ Check belts and rollers for wear and tear․ Ensure grounding connections are secure for safety․ Schedule professional inspections annually if used commercially․

5․3 Cleaning and Care Tips

Regularly clean the lint filter after each use to maintain efficiency․ Inspect venting systems for blockages and ensure proper airflow․ Avoid using flexible plastic venting materials․ Clean the exterior and interior surfaces with mild detergents․ Refer to manufacturer guidelines for specific cleaning recommendations to preserve performance and longevity;

Troubleshooting Common Issues

This section helps identify and resolve common problems with your UniMac dryer, such as poor airflow or error codes, with step-by-step solutions to restore optimal performance quickly and safely․

6․1 Identifying Common Problems

Common issues with UniMac dryers include poor airflow, error codes, and improper installation․ Check for clogged vents, malfunctioning sensors, or incorrect settings․ Refer to the manual for diagnostic steps and solutions to address these problems effectively and ensure safe operation․

6․2 Diagnostic Steps and Solutions

For UniMac dryers, start diagnostics by checking error codes in the manual․ Inspect venting systems for blockages and ensure proper grounding․ Consult the troubleshooting section for specific solutions, such as resetting sensors or replacing faulty components to restore optimal performance․

6․3 Error Codes and Their Meanings

The UniMac dryer manual includes a detailed section on error codes, helping users identify and resolve issues quickly․ Codes like “E1” or “E2” indicate specific problems, such as sensor malfunctions or overheating․ Refer to the manual for a full list of codes and their corresponding solutions to ensure proper troubleshooting․

Energy Efficiency and Performance

This section highlights the UniMac dryer’s energy-saving features and performance-enhancing technologies․ Learn how to optimize eco-friendly operation while maintaining high-efficiency drying results, reducing energy consumption and environmental impact effectively․

7․1 Energy-Saving Features

The UniMac dryer incorporates advanced energy-saving features, such as smart sensors and eco-mode, to reduce energy consumption․ These technologies optimize drying cycles, lowering utility bills and environmental impact while maintaining high performance․ The dryer also meets ENERGY STAR standards, ensuring efficient operation and eco-friendly results for users․

7․2 Optimizing Drying Performance

Maximize efficiency by ensuring proper installation, venting, and loading․ Use the dryer’s advanced sensors and customizable settings to tailor cycles for different fabrics․ Regularly clean filters and vents to maintain airflow, reducing drying time and energy use․ Proper maintenance ensures consistent performance and extends the dryer’s lifespan․

7․3 Environmental Benefits

UniMac dryers are designed with eco-friendly features, including energy-saving modes and efficient heat management․ Proper use reduces energy consumption and lowers greenhouse gas emissions․ Regular maintenance ensures optimal performance, contributing to environmental sustainability and prolonging the appliance’s lifespan․

Programming and Customization

UniMac dryers offer customizable programming options, allowing users to tailor drying cycles to specific fabric types and loads․ Advanced settings enable precise control over temperature, timing, and energy use for optimal results․

8․1 Programming Options

UniMac dryers offer customizable programming options, allowing users to tailor drying cycles for specific fabric types, temperature settings, and load sizes․ Advanced controls enable precise adjustments to optimize drying performance and energy efficiency, ensuring ideal results for every load․

8․2 Customizing Drying Cycles

The UniMac dryer allows users to customize drying cycles by adjusting temperature, time, and special settings for delicate or heavy-duty fabrics․ Use the control panel to navigate through options and tailor cycles to specific needs, ensuring optimal drying performance while protecting fabrics and reducing energy consumption․

8․3 Advanced Settings and Features

UniMac dryers offer advanced settings, including energy-efficient modes, eco-friendly options, and smart sensors for optimal drying․ Customize cycles with temperature control, delay start, and moisture-sensing technology․ Additional features include Wi-Fi connectivity, remote monitoring, and diagnostic tools for enhanced convenience and performance․ These settings ensure efficient, tailored drying for all fabric types․

User Responsibilities and Best Practices

Ensure safety by following all instructions, performing regular inspections, and adhering to maintenance schedules․ Proper loading, balanced ventilation, and energy-efficient practices maximize performance and longevity of your UniMac dryer․

9․1 Pre-Use Checks

Before each use, ensure the dryer is installed correctly, grounded properly, and venting systems are clear․ Verify all components function correctly, inspect for blockages, and ensure the machine is level․ Always read the manual and follow safety guidelines to prevent accidents and maintain efficiency․

9․2 Loading and Unloading Guidelines

Always check load size and type before starting․ Avoid overloading, as this can reduce efficiency and cause damage․ Ensure even distribution of items for balanced drying․ When unloading, remove clothes promptly to prevent wrinkles and check for loose items․ Follow manual instructions for safe operation․

9․3 Regular Inspection Requirements

Regularly inspect your UniMac dryer to ensure optimal performance and safety․ Check venting systems for blockages, inspect belts for wear, and clean filters after each use․ Verify electrical connections and grounding according to manual guidelines․ Addressing issues promptly prevents malfunctions and ensures efficient operation․

Compliance with Regulations

Ensure your UniMac dryer operates in compliance with local codes, safety standards, and environmental regulations․ Adhere to installation and operational guidelines for optimal performance and legal conformity․

10․1 Local Codes and Standards

Always install and operate your UniMac dryer in accordance with local building codes, fire safety regulations, and electrical standards․ Compliance ensures safe operation, avoids penalties, and meets community guidelines for both residential and commercial settings․ Proper installation by certified professionals is strongly recommended to maintain adherence to these standards․

10․2 Environmental Regulations

Adhere to environmental regulations by ensuring proper venting and energy-efficient operation․ UniMac dryers are designed with eco-friendly features to minimize energy consumption and emissions․ Always follow local recycling guidelines for parts and materials․ Proper disposal of packaging and hazardous materials is essential to promote sustainability and environmental protection․

10․3 Safety Compliance Measures

Adhere to all safety standards by following proper installation, grounding, and operational guidelines․ Ensure compliance with local codes and manufacturer instructions to prevent hazards․ Regular inspections and maintenance are crucial to uphold safety protocols and protect users from potential risks associated with dryer operation․

Common Issues and Solutions

Explore common issues with your UniMac dryer, such as malfunctioning cycles or poor drying performance․ Solutions include checking electrical connections, ensuring proper venting, and referring to the troubleshooting guide for quick fixes․

11․1 Frequently Encountered Problems

Common issues with UniMac dryers include error codes, poor drying performance, and uneven heat distribution․ Improper installation, clogged vents, and faulty sensors can also cause malfunctions․ Refer to the troubleshooting guide in the manual for diagnostic steps and solutions to address these problems effectively․

11․2 DIY Repair and Maintenance Tips

Regularly clean the lint filter and venting system to ensure proper airflow․ Check and tighten loose connections․ Inspect and replace worn belts or damaged hoses․ Refer to the manual for guidance on basic repairs and maintenance to keep your UniMac dryer running efficiently and safely․

11․3 When to Call a Professional

If you encounter complex issues like error codes, electrical malfunctions, or major component failures, contact a UniMac-authorized technician․ Professional assistance ensures safety, proper repairs, and warranty compliance․ Avoid attempting repairs beyond your expertise to prevent further damage or safety risks․

Customer Support and Resources

UniMac offers dedicated customer support through their document portal and hotline (1-800-587-5458)․ Access manuals, troubleshooting guides, and warranty information online for reliable assistance and service options․

12․1 Contact Information

For inquiries or assistance, contact UniMac at 1-800-587-5458․ Their office is located at 221 Shepard Street, Ripon, WI 54971-0990․ Visit their official website for additional resources or reach out through their online portal for support with manuals, warranties, and troubleshooting guides․

12․2 Online Resources and Downloads

Access UniMac’s official document portal for manuals, troubleshooting guides, and warranty information․ Visit their website or call 1-800-587-5458 for assistance․ Models like UT075N and UT075NRUF6A2W01 have dedicated resources, ensuring easy downloads for operation, maintenance, and repair instructions to keep your dryer running efficiently․

12․3 Warranty and Service Options

UniMac offers comprehensive warranty programs and dedicated service support․ For inquiries, contact 1-800-587-5458 or visit their document portal․ Warranty details vary by model, ensuring coverage for parts and labor․ Keep this manual for future reference to maintain warranty validity and access to professional service options․

plate tectonics questions answer key pdf

Plate tectonics questions and answer key pdf provides a comprehensive review of Earth’s structure‚ including layers‚ boundaries‚ and processes․ It aids in understanding convection currents‚ plate motion‚ and geological phenomena through multiple-choice and fill-in-the-blank exercises․

1․1 Definition and Overview of Plate Tectonics

Plate tectonics is the theory that Earth’s lithosphere is divided into large‚ rigid plates that move relative to each other․ These plates float on the asthenosphere‚ driven by convection currents in the mantle․ The interactions at their boundaries—divergent‚ convergent‚ and transform—shape Earth’s surface‚ causing phenomena like earthquakes‚ volcanoes‚ and mountain formation․ This framework explains the fit of continents and magnetic striping‚ providing evidence for its validity․

1․2 Importance of Studying Plate Tectonics

Studying plate tectonics is crucial for understanding Earth’s geological processes‚ such as earthquakes‚ volcanoes‚ and the creation of mountain ranges․ It explains the movement of continents and oceanic crust‚ aiding in natural disaster preparedness and resource exploration․ Plate tectonics provides insights into Earth’s history‚ climate change‚ and the distribution of natural resources‚ making it vital for geologists‚ environmental scientists‚ and policymakers to address global challenges effectively․

The Four Major Layers of the Earth

The Earth consists of the crust‚ mantle‚ outer core‚ and inner core․ These layers vary in composition and temperature‚ with the lithosphere floating on the mantle․

2․1 The Crust

The crust is Earth’s outermost layer‚ varying in thickness from 5-70 km․ It is composed of rocks and minerals‚ with oceanic crust denser than continental crust․ The crust floats on the mantle‚ forming the lithosphere‚ which is divided into tectonic plates; These plates’ movements shape Earth’s surface‚ creating mountains‚ volcanoes‚ and oceanic ridges․ The crust is where most geological activity occurs‚ including earthquakes and volcanic eruptions‚ making it a key focus in studying plate tectonics;

2․2 The Mantle

The mantle is the thick layer beneath the crust‚ extending from 35 km to 2‚900 km in depth․ It consists of hot‚ viscous rock that flows slowly over time․ The upper mantle and lower mantle differ in composition and temperature‚ with the asthenosphere in the upper mantle allowing partial melting and convection currents․ These currents drive plate tectonics‚ influencing Earth’s surface processes and geological activity; The mantle’s properties are crucial for understanding Earth’s internal dynamics and plate movements․

2․3 The Outer Core

The outer core is a liquid layer‚ 2‚250 km thick‚ composed mainly of iron and nickel․ It surrounds the inner core and plays a key role in generating Earth’s magnetic field through its fluid motion․ The outer core’s temperature ranges from 4‚000°C to 6‚000°C‚ and its liquid state allows for convection‚ influencing Earth’s geodynamo․ This layer is crucial for understanding Earth’s magnetic properties and protection from solar winds․

2․4 The Inner Core

The inner core is Earth’s central‚ solid layer‚ composed primarily of iron and nickel‚ with a thickness of approximately 1‚220 km․ Despite extreme temperatures‚ it remains solid due to immense pressure․ The inner core’s formation and growth are linked to the cooling and solidification of the outer core‚ influencing Earth’s magnetic field․ Its existence is crucial for understanding Earth’s internal structure and magnetic properties‚ as revealed in plate tectonics studies and answer keys․

Types of Plate Boundaries

Plate boundaries are zones where tectonic plates interact‚ categorized as divergent‚ convergent‚ or transform․ They drive geological activity‚ shaping Earth’s surface through processes like rifting‚ subduction‚ and faulting․

3․1 Divergent Boundaries

Divergent boundaries occur where plates move apart‚ allowing magma to rise‚ solidify‚ and form new crust․ The East Pacific Rise exemplifies this process‚ creating basaltic crust and elevated topography․ These boundaries are associated with volcanic activity‚ shallow earthquakes‚ and the creation of mid-ocean ridges․ They play a crucial role in plate tectonics‚ driving oceanic and continental rifting‚ and are fundamental to understanding Earth’s dynamic surface․

3․2 Convergent Boundaries

Convergent boundaries occur where two plates move toward each other‚ resulting in subduction or collision․ In subduction zones‚ one plate is forced beneath another‚ often producing deep-sea trenches and volcanic arcs‚ such as the Andes․ Continental collisions‚ like the Himalayas‚ create mountain ranges․ These boundaries are associated with intense earthquakes and volcanic activity‚ shaping Earth’s surface through destructive processes that reshape crust and mantle․

3․3 Transform Boundaries

Transform boundaries are where two plates slide past each other horizontally‚ neither creating nor destroying crust․ These boundaries‚ like the San Andreas Fault‚ are characterized by transform faults․ They produce significant earthquakes due to friction and sudden movement․ Plates at transform boundaries do not converge or diverge but exhibit lateral motion‚ transferring tectonic stress between other boundaries‚ making them crucial in understanding plate tectonics and associated seismic activity․

Key Processes in Plate Tectonics

Convection currents in the mantle drive plate motion‚ creating forces like ridge push and slab pull․ These processes shape Earth’s surface through tectonic activity and geological phenomena․

4․1 Convection Currents in the Mantle

Convection currents in the mantle are slow‚ heat-driven flows of hot‚ viscous rock․ These currents transfer thermal energy from the core-mantle boundary to the Earth’s surface․ As mantle material heats‚ it rises‚ cools‚ and sinks‚ creating circulation patterns․ This movement exerts forces on tectonic plates‚ driving processes like ridge push and slab pull․ Convection currents are a key mechanism for plate tectonics‚ shaping Earth’s surface and influencing geological activity‚ such as earthquakes and volcanic eruptions․

4․2 Plate Motion and Driving Forces

Plate motion is driven by forces such as ridge push‚ slab pull‚ and basal drag․ Ridge push occurs as new crust is created at divergent boundaries‚ pushing plates apart․ Slab pull is the downward force exerted by dense‚ sinking oceanic crust․ Basal drag‚ friction between the plate and mantle‚ resists motion․ These forces‚ powered by mantle convection‚ cause plates to move at rates of a few centimeters per year‚ shaping Earth’s surface and triggering geological events like earthquakes and volcanoes․

Evidence Supporting Plate Tectonics

Fossil evidence and magnetic striping are key proofs․ Fossils of identical ancient species across continents suggest landmasses were once connected․ Magnetic stripes on ocean floors reveal seafloor spreading․

5․1 Fossil Evidence

Fossil evidence strongly supports plate tectonics․ Identical fossils of ancient species‚ like Mesosaurus and Glossopteris‚ are found on different continents‚ indicating these landmasses were once connected․ Fossilized plants and animals‚ such as those from the same geological period‚ are discovered across oceans‚ suggesting continental drift․ This alignment of fossils across the globe provides clear evidence that continents have moved over time‚ aligning with the theory of plate tectonics and the idea of a single supercontinent‚ Pangaea․

5․2 Magnetic Striping

Magnetic striping provides strong evidence for seafloor spreading and plate tectonics․ Rocks on either side of mid-ocean ridges exhibit alternating magnetic polarities‚ reflecting Earth’s magnetic field reversals․ As magma cools‚ it records the magnetic field’s orientation‚ creating parallel strips․ This pattern matches on opposite sides of the ridge‚ confirming that new oceanic crust is formed and pushed apart by plate movement․ This symmetry supports the theory of plate tectonics and continental drift․

Practical Questions and Answers

This section includes multiple-choice and fill-in-the-blank questions covering key plate tectonics concepts‚ such as Earth’s layers‚ plate boundaries‚ and convection currents‚ with answers provided for review․

6․1 Multiple Choice Questions

This section features multiple-choice questions designed to test knowledge on plate tectonics‚ covering Earth’s layers‚ plate boundaries‚ and convection currents․ Questions assess understanding of key concepts like boundary types and forces driving plate motion․ Each question offers several options‚ requiring students to identify the correct answer․ The answer key provides correct responses for self-assessment‚ reinforcing learning by identifying areas needing further study․ This format aids in quick revision and ensures a strong grasp of fundamental principles;

6․2 Fill-in-the-Blank Questions

Fill-in-the-blank questions challenge students to complete statements about plate tectonics‚ focusing on key concepts like plate boundaries‚ Earth’s layers‚ and convection currents․ These questions assess detailed knowledge‚ such as naming specific plate boundaries or describing processes like ridge push․ The answer key provides correct completions‚ allowing students to verify their understanding․ This format ensures active learning and reinforces retention of critical terminology and processes in plate tectonics․ It complements multiple-choice questions for a well-rounded assessment․

Case Studies and Real-World Applications

Case studies explore real-world examples like the East Pacific Rise and hotspots‚ providing practical insights into plate tectonics․ These applications help understand geological phenomena and their impact․

7․1 The East Pacific Rise

The East Pacific Rise is a prominent divergent plate boundary where new oceanic crust is created․ It runs along the floor of the Pacific Ocean‚ characterized by volcanic activity and the formation of mid-ocean ridges․ This region exemplifies plate tectonics in action‚ with seafloor spreading generating new crust as tectonic plates move apart․ The Rise is a key example of how convection currents in the mantle drive plate motion and shape Earth’s surface․ Its study provides insights into geological processes and real-world applications of tectonic theory․

7․2 Hotspots and Volcanic Activity

Hotspots are zones where magma rises to Earth’s surface‚ creating volcanic activity․ These are often far from plate boundaries‚ like the Hawaiian Islands‚ formed by mantle plumes․ Volcanic activity at hotspots results in shield volcanoes and seamounts․ Plate movement over fixed hotspots creates volcanic chains‚ providing evidence for tectonic plate motion․ Studying these phenomena helps explain Earth’s geological processes and the dynamic nature of its surface‚ linking to plate tectonics theory and real-world applications․

The Significance of Plate Tectonics Theory

Plate tectonics explains Earth’s geological phenomena‚ such as earthquakes‚ volcanoes‚ and continental drift․ It provides a framework for understanding the dynamic processes shaping our planet’s surface over time․

8․1 Explaining Earthquakes and Volcanoes

Plate tectonics explains earthquakes and volcanoes through the movement of lithospheric plates․ Convection currents in the mantle drive plate motion‚ causing interactions at boundaries․ Divergent boundaries create new crust‚ often producing volcanic activity‚ as seen at the East Pacific Rise․ Convergent boundaries may lead to subduction‚ triggering earthquakes and volcanoes․ Transform boundaries cause friction‚ resulting in earthquakes․ These processes shape Earth’s surface‚ illustrating the dynamic nature of our planet and the importance of studying plate tectonics to understand geological hazards․

8․2 Understanding Continental Drift

Plate tectonics explains continental drift by revealing how lithospheric plates move over the asthenosphere․ Fossil evidence and the fit of continents support this theory․ Plate boundaries and convection currents drive the movement‚ aligning with historical data․ This understanding was pivotal in developing plate tectonics‚ providing a framework to explain Earth’s dynamic surface and the distribution of landmasses over time․

Assessment and Review

This section includes multiple-choice and fill-in-the-blank questions with an answer key‚ providing a comprehensive review of plate tectonics concepts and processes for better understanding and mastery․

9․1 Answer Key for Practice Questions

The answer key provides correct responses to multiple-choice and fill-in-the-blank questions‚ covering Earth’s layers‚ plate boundaries‚ and tectonic processes․ It ensures accuracy in assessments and helps students verify their understanding of key concepts like convection currents‚ plate motion‚ and geological features․ This resource is essential for self-review and improving knowledge retention in plate tectonics․

9․2 Tips for Mastering Plate Tectonics

Mastering plate tectonics requires regular practice with multiple-choice and fill-in-the-blank questions․ Focus on understanding Earth’s layers‚ plate boundaries‚ and processes like convection currents․ Use visual aids such as diagrams and maps to reinforce concepts․ Stay updated with research and review key theories․ Consistent practice and applying concepts to real-world examples will enhance comprehension and retention of plate tectonics principles․

The study of plate tectonics questions and answer key pdf provides a comprehensive review of Earth’s structure‚ processes‚ and phenomena‚ aiding in understanding geological concepts through practical exercises․

10․1 Summary of Key Concepts

Plate tectonics questions and answer key pdf summarizes Earth’s structure‚ including crust‚ mantle‚ outer and inner core․ It explains plate boundaries—divergent‚ convergent‚ and transform—and processes like convection currents driving plate motion․ The PDF highlights evidence such as fossil records and magnetic striping‚ supporting the theory․ It also covers practical applications‚ like understanding earthquakes and volcanoes‚ and the importance of plate tectonics in shaping Earth’s surface and geological history․

10․2 Future Directions in Plate Tectonics Research

Future research in plate tectonics aims to explore the initiation of plate boundaries‚ improve models of mantle convection‚ and investigate the role of water in Earth’s mantle․ Advanced technologies like AI and satellite data will enhance understanding of plate dynamics․ Studying ancient plate tectonics and its link to Earth’s habitability is another focus․ These efforts will refine theories‚ address unanswered questions‚ and deepen insights into Earth’s evolution and geological processes on a global scale․